3 月に開催されていた picoCTF 2024 に0nePadding で参加し、64 位/6957 チーム でした。
いつも通り Rev と Forensic 中心に Writeup を書きます。
もくじ
- packer(Rev)
- FactCheck(Rev)
- WinAntiDbg0x100(Rev)
- WinAntiDbg0x200(Rev)
- WinAntiDbg0x300(Rev)
- Classic Crackme 0x100(Rev)
- weirdSnake(Rev)
- Scan Surprise(Forensic)
- Verify(Forensic)
- CanYouSee(Forensic)
- Secret of the Polyglot(Forensic)
- Mob psycho(Forensic)
- endianness-v2(Forensic)
- Blast from the past(Forensic)
- Dear Diary(Forensic)
- まとめ
packer(Rev)
Reverse this linux executable?
問題バイナリとして与えられた ELF ファイルはタイトルの通り UPX でパッキングされたファイルでした。
そこで、upx でアンパックしました。
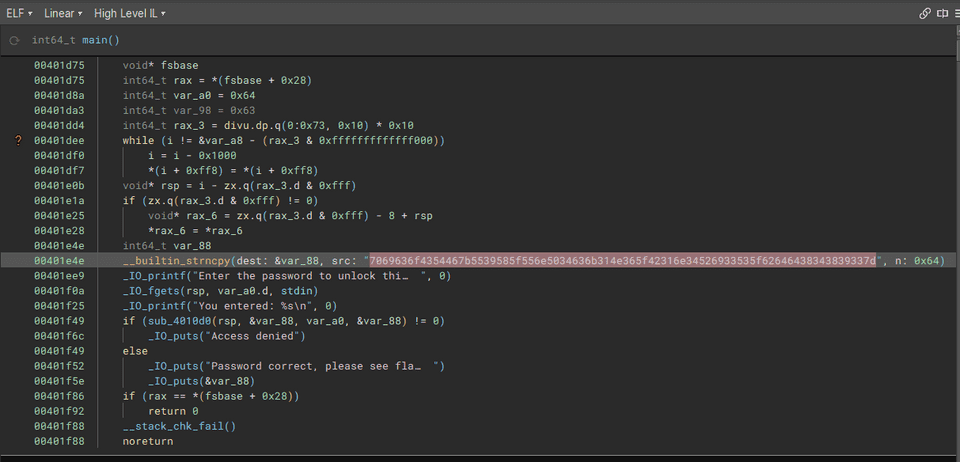
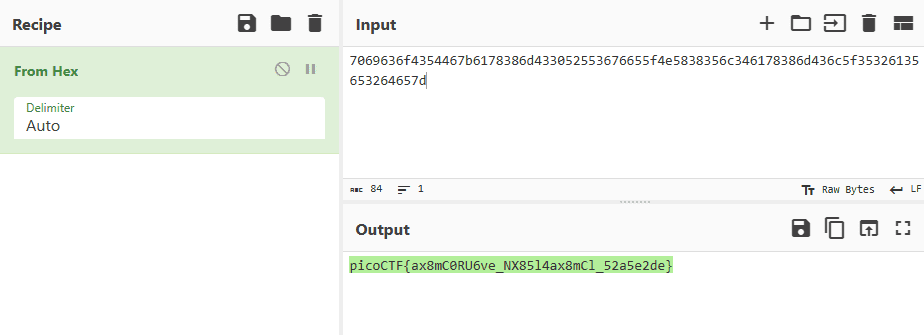
アンパックしたバイナリを解析すると、Hexdump した Flag 文字列が埋め込まれていました。
これをデコードすることで Flag を取得できました。
FactCheck(Rev)
This binary is putting together some important piece of information… Can you uncover that information? Examine this file. Do you understand its inner workings?
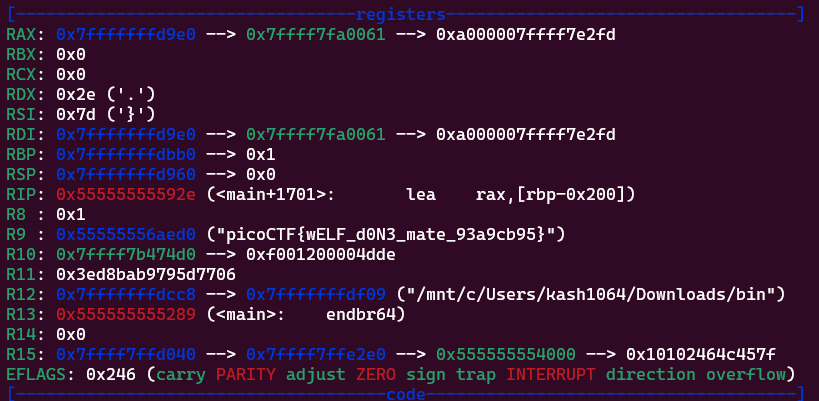
問題バイナリを解析して見ると、「何も出力しないが、メモリ内で Flag を展開する」プログラムでした。
そこで、Flag を展開するところまで gdb で解析を行い、Flag を取得しました。
WinAntiDbg0x100(Rev)
This challenge will introduce you to ‘Anti-Debugging.’ Malware developers don’t like it when you attempt to debug their executable files because debugging these files reveals many of their secrets! That’s why, they include a lot of code logic specifically designed to interfere with your debugging process. Now that you’ve understood the context, go ahead and debug this Windows executable! This challenge binary file is a Windows console application and you can start with running it using cmd on Windows. Challenge can be downloaded here.
Windows アンチデバッグシリーズの 1 問目でした。
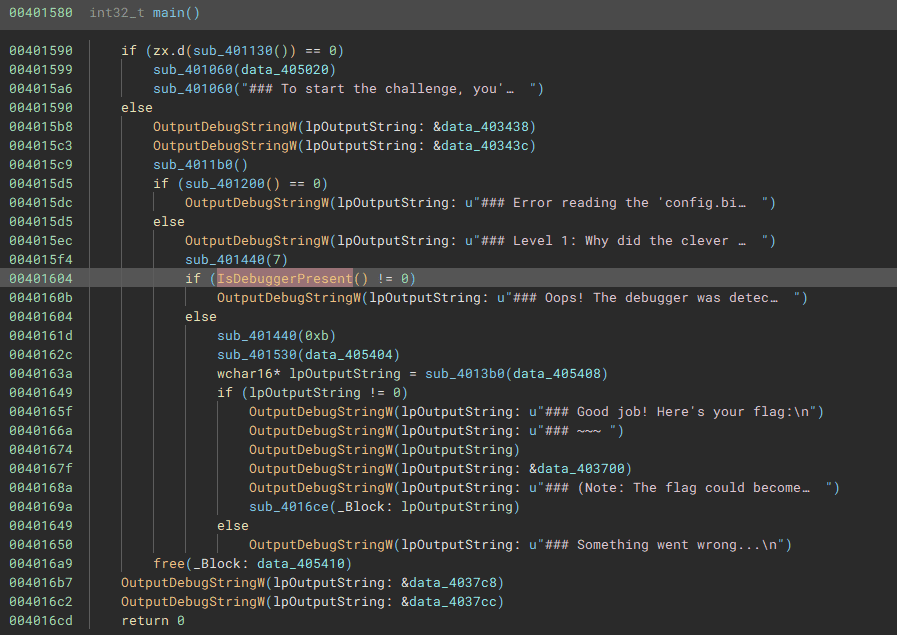
問題バイナリを解析すると IsDebugerPresent の結果をチェックしていることがわかります。
典型なのでバイナリにパッチを当ててからデバッガを使用し、Flag を取得しました。
WinAntiDbg0x200(Rev)
If you have solved WinAntiDbg0x100, you’ll discover something new in this one. Debug the executable and find the flag! This challenge executable is a Windows console application, and you can start by running it using Command Prompt on Windows. This executable requires admin privileges. You might want to start Command Prompt or your debugger using the ‘Run as administrator’ option. Challenge can be downloaded here.
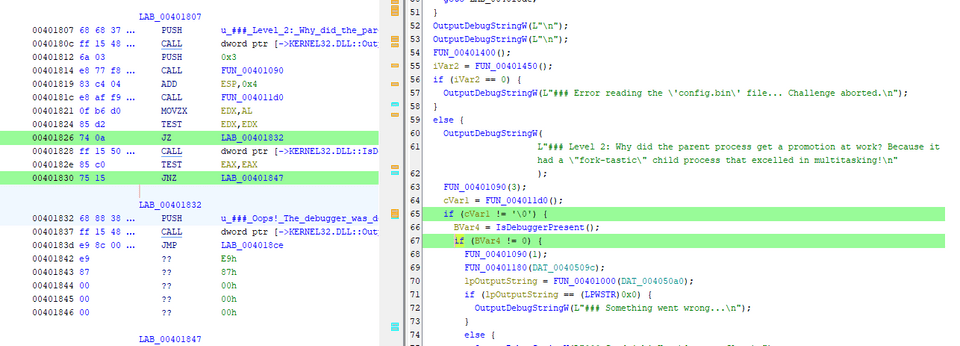
問題バイナリを読むと以下の 2 箇所に AntiDebug の機構が埋め込まれていることがわかります。
そこで、この 2 箇所にそれぞれパッチを当ててデバッガ実行することで Flag を取得しましtあ。
WinAntiDbg0x300(Rev)
This challenge is a little bit invasive. It will try to fight your debugger. With that in mind, debug the binary and get the flag! This challenge executable is a GUI application and it requires admin privileges. And remember, the flag might get corrupted if you mess up the process’s state. Challenge can be downloaded here.
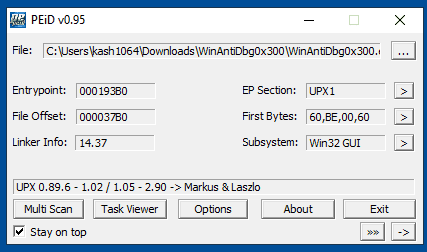
問題バイナリを見ると、UPX でパッキングされたバイナリであることがわかりました。
そこで、まずはバイナリをアンパックしました。
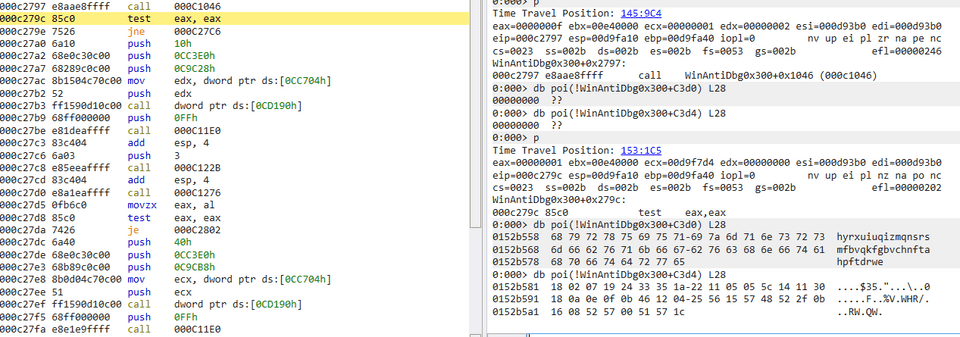
アンパックしたバイナリを見ると複数の AntiDebug 機構が埋め込まれていたので、それぞれにパッチを当てればよさそうでしたが、
なぜかバイナリをアンパックするとアクセス違反の例外でクラッシュするようになってしまい実行できない問題が発生し、パッチを当てる以前にアンパックしたプログラムを起動することすらできませんでした。
そこで、アンパックしたバイナリを使用することを諦め、TTD を使用してアンチデバッグを回避しつつ静的解析で Flag を取得することにしました。
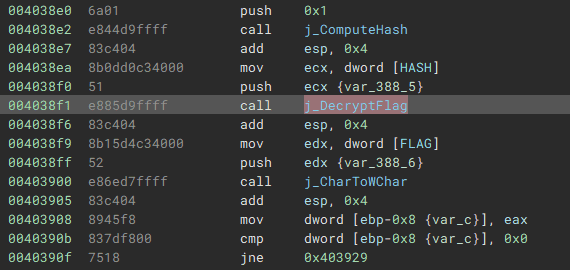
アンパックした問題バイナリを解析すると、HASH というデータ領域のアドレスを引数として DecryptFlag 関数が呼ばれる箇所が存在することがわかります。
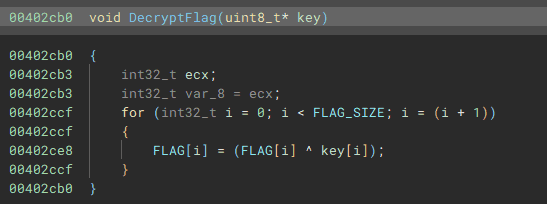
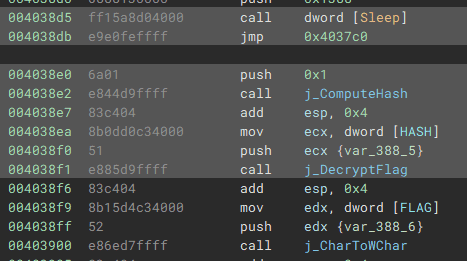
DecryptFlag 関数の実装は以下の通りでした。シンプルに引数で受け取った HASH とデータ領域 FLAG のバイト列を XOR しているようです。
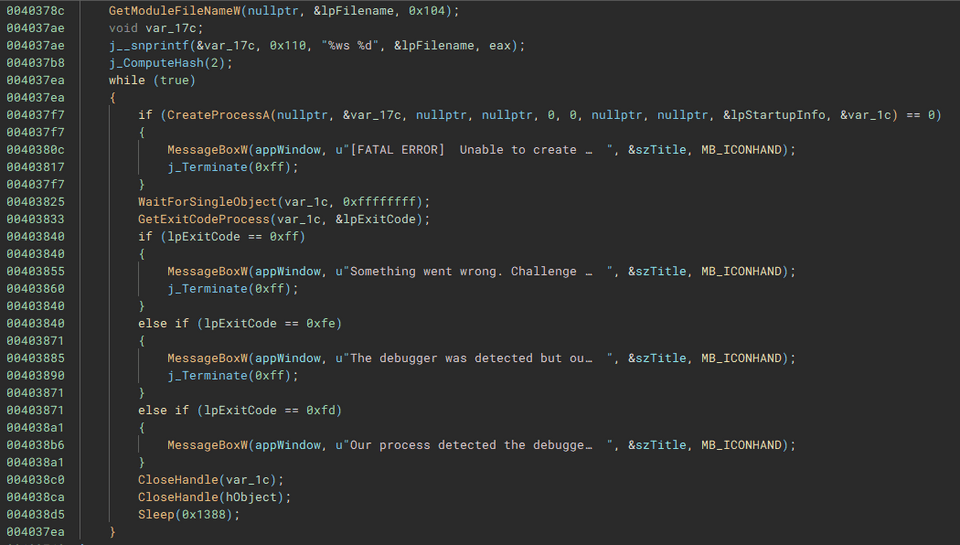
しかし、このコードは以下のような無限ループの処理を抜けた先に実装されているため、通常は実行されません。
(そのため、デコンパイル結果にも現れません)
また、FLAG と HASH のバイト列はプログラムの実行中に展開/変更されるため、静的解析で値を取得することが難しかったです。
そこで WinDbg の TTD を使用してアンチデバッグを回避しつつ動的解析を行い、FLAG と HASH のバイト列の初期値と、DecryptFlag 関数が呼び出される直前の状態を確認することにしました。
TTD は Time Travel Debugging の略称で、プログラム実行時のトレースを取得できます。
TTD で取得したトレースを解析する場合はデバッガのようにレジスタ操作などは行うことができませんが、多くのアンチデバッグ手法を無視して実行することができます。
TTD で解析を行ったところ、FLAG と HASH の値は初めは空でしたが、ReadConfig 関数が呼び出された直後に値がセットされたことがわかります。
さらに実行を進めていくと、この時の FLAG の値は不変であるものの、キーとなる HASH の値が頻繁に更新されていることがわかります。
具体的には、定期的に実行されている ComputeHash 関数の実行の度に値が更新されます。
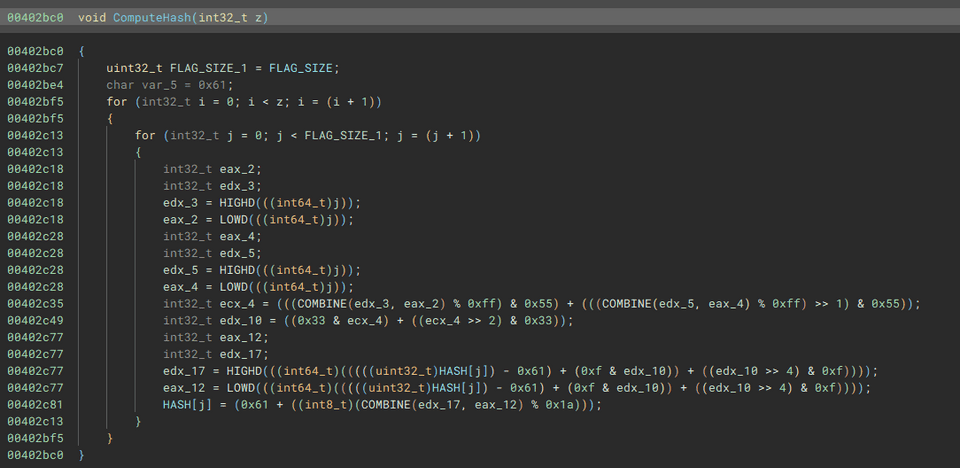
ComputeHash 関数は以下のような実装になっており、引数として受け取った値(1~3)の回数だけ HASH を変更する処理のループを回して HASH の値を変化させる処理です。
最終的に無限ループを抜けて DecryptFlag を呼び出す場合には、通常は直前に一度 ComputeHash(1) が実行されます。
今回は TTD を使用しており処理の変更ができないため、ここからは静的解析で Flag を取得します。
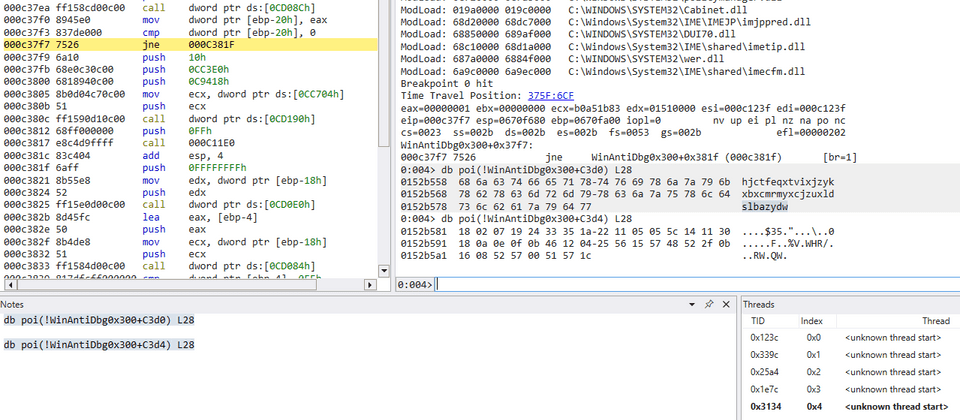
まずは、TTD でループに差し掛かったタイミングの HASH と FLAG のデータを抜き出します。
次に、この時点で取得した HASH の文字列(hjctfeqxtvixjzykxbxcmrmyxcjzuxldslbazydw ) を Python で書き起こした ComputeHash に渡します。
この時、ループ回数は 1 回を指定しています。
FLAG_SIZE = 0x28
param_1 = 1
HASH = [ord(c) for c in "hjctfeqxtvixjzykxbxcmrmyxcjzuxldslbazydw"]

for i in range(param_1):
    for j in range(FLAG_SIZE):
        uVar2 = (j % 0xff & 0x55) + (j % 0xff >> 1 & 0x55)
        uVar2 = (uVar2 & 0x33) + (uVar2 >> 2 & 0x33)
        HASH[j] = chr((HASH[j] - 0x61 + (uVar2 & 0xf) + (uVar2 >> 4)) % 0x1a + ord('a'))

print("".join(HASH))
最後に上記のスクリプトで取得した文字列 hkdvggsauxkalcboydzfoupczfmdxbpitnddbbga と FLAG のバイト列を XOR して正しい Flag を取得します。
FLAG = [0x18,0x02,0x07,0x19,0x24,0x33,0x35,0x1a,0x22,0x11,0x05,0x05,0x5c,0x14,0x11,0x30,0x18,0x0a,0x0e,0x0f,0x0b,0x46,0x12,0x04,0x25,0x56,0x15,0x57,0x48,0x52,0x2f,0x0b,0x16,0x08,0x52,0x57,0x00,0x51,0x57,0x1c]
FLAG_SIZE = 0x28
KEY = "hkdvggsauxkalcboydzfoupczfmdxbpitnddbbga"
for i in range(FLAG_SIZE):
    print(chr(FLAG[i]^ord(KEY[i%len(KEY)])),end="")
これで正解の Flag を取得できました。
Classic Crackme 0x100(Rev)
A classic Crackme. Find the password, get the flag! Binary can be downloaded here. Crack the Binary file locally and recover the password. Use the same password on the server to get the flag! Additional details will be available after launching your challenge instance.
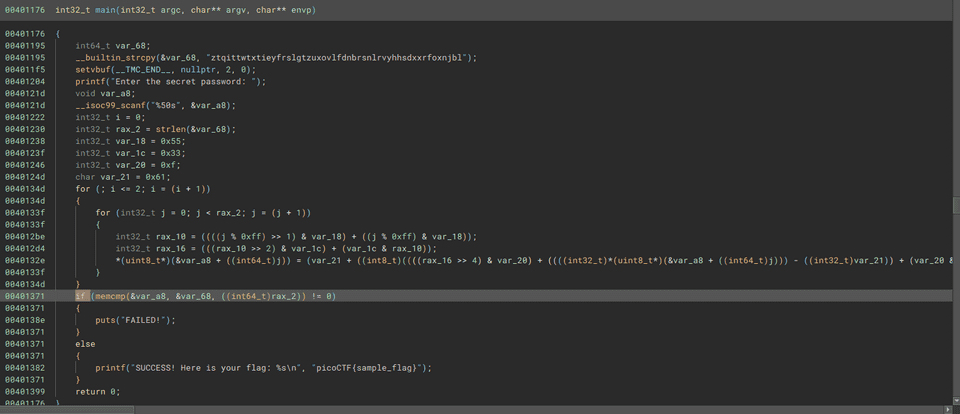
問題バイナリとして与えられたプログラムを解析すると、以下の実装となっておりました。
ループ内で実装されているパスワードの検証処理を読むと先頭から 1 文字ずつの比較を行っていることがわかるので、Python で書き起こしたコードを使用してパスワードを総当たりで求めることにします。
key = [ ord(c) for c in "ztqittwtxtieyfrslgtzuxovlfdnbrsnlrvyhhsdxxrfoxnjbl"]
l = len(key)

flag = [ ord(c) for c in "ztqittwtxtieyfrslgtzuxovlfdnbrsnlrvyhhsdxxrfoxnjbl"]

for a in range(l):
    for b in range(0x21,0x7f):
        K = 0x55
        M = 0x33
        H = 0x61
        I = 0xf
        tmp = flag.copy()
        tmp[a] = b

        for i in range(3):
            for j in range(l):
                N = (((j % 0xff) >> 1) & K) + ((j % 0xff) & K)
                L = (((N >> 2) & M) + (M & N))
                tmp[j] = (H + (((((L >> 4) & I) + tmp[j] - H) + (I & L))) % 0x1a)

        if tmp[0:a+1] == key[0:a+1]:
            flag[a] = b

for f in flag:
    print(chr(f),end="")

# zqn}qnqkun}vswigi{nqoofjfwu|sfgyilpp|yjrroitfl|uv}
上記の Solver で取得したパスワードをサーバに送り込むと、正しい Flag を取得できました。
weirdSnake(Rev)
I have a friend that enjoys coding and he hasn’t stopped talking about a snake recently He left this file on my computer and dares me to uncover a secret phrase from it. Can you assist?
問題バイナリとして与えられたファイルはコンパイルされた Python スクリプトのアセンブリコードのようでした。
ちまちま実装を読むと単にキーを使用して Flag を XOR しているだけの処理でしたので、以下の Solver で Flag を取得しました。
# l="""10,0,4,2,1,54,4,2,41,6,3,0,8,4,112,10,5,32,12,6,25,14,7,49,16,8,33,18,9,3,20,3,0,22,3,0,24,10,57,26,5,32,28,11,108,30,12,23,32,13,48,34,0,4,36,14,9,38,15,70,40,16,7,42,17,110,44,18,36,46,19,8,48,11,108,50,16,7,52,7,49,54,20,10,56,0,4,58,21,86,60,22,43,62,23,105,64,24,114,66,25,91,68,3,0,70,26,71,72,27,106,74,28,124,76,29,93,78,30,78""".split(",")
# arr = []
# for i in range(len(l)):
#     if i % 3 == 2:
#         arr.append(int(l[i]))

arr = [4, 54, 41, 0, 112, 32, 25, 49, 33, 3, 0, 0, 57, 32, 108, 23, 48, 4, 9, 70, 7, 110, 36, 8, 108, 7, 49, 10, 4, 86, 43, 105, 114, 91, 0, 71, 106, 124, 93, 78]
key_str = "t_Jo3"
key = [ord(c) for c in key_str]

for i in range(len(arr)):
    print(chr(arr[i] ^ key[i % len(key)]),end="")

# picoCTF{N0t_sO_coNfus1ng_sn@ke_68433562}
Scan Surprise(Forensic)
I’ve gotten bored of handing out flags as text. Wouldn’t it be cool if they were an image instead? You can download the challenge files here: challenge.zip Additional details will be available after launching your challenge instance.
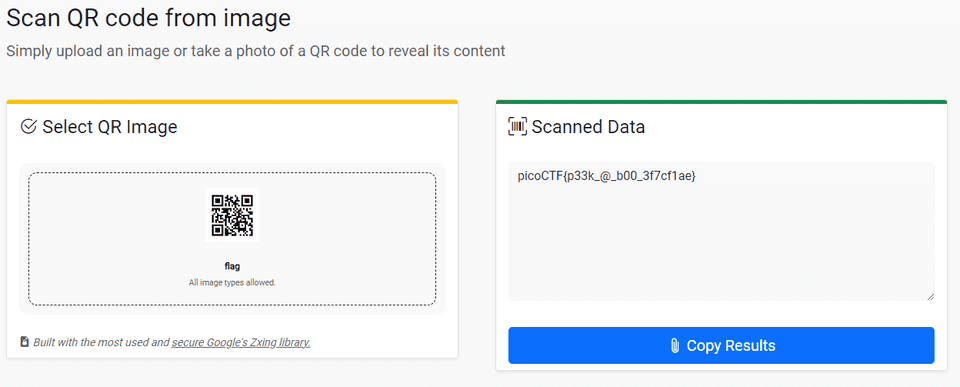
問題バイナリとして与えられた QR コードをオンラインツールで読み込ませると Flag を取得できました。
Verify(Forensic)
People keep trying to trick my players with imitation flags. I want to make sure they get the real thing! I’m going to provide the SHA-256 hash and a decrypt script to help you know that my flags are legitimate. You can download the challenge files here: challenge.zip Additional details will be available after launching your challenge instance.
問題バイナリとして与えられたファイルと復号コードを一部改変して、ディレクトリ内のすべてのファイルを総当たりで復号するように変換することで Flag を取得できました。
#!/bin/bash

# # Check if the user provided a file name as an argument
# if [ $# -eq 0 ]; then
#     echo "Expected usage: decrypt.sh <filename>"
#     exit 1
# fi

directory="/home/ubuntu/Hacking/CTF/2024/picoCTF/Forensic/Verify/drop-in/files"
for file_name in "$directory"/*
do
    # echo "Processing $file_name"
    # Check if the provided argument is a file and not a folder
    if [ ! -f "$file_name" ]; then
        echo "Error: '$file_name' is not a valid file. Look inside the 'files' folder with 'ls -R'!"
        exit 1
    fi

    # If there's an error reading the file, print an error message
    if ! openssl enc -d -aes-256-cbc -pbkdf2 -iter 100000 -salt -in "$file_name" -k picoCTF; then
        echo "Error: Failed to decrypt '$file_name'. This flag is fake! Keep looking!"
    fi
done

# picoCTF{trust_but_verify_c6c8b911}
CanYouSee(Forensic)
How about some hide and seek? Download this file here.
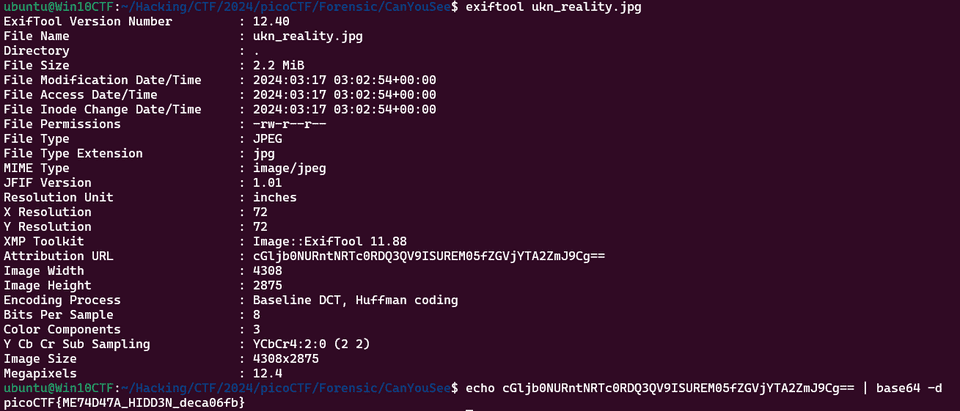
問題バイナリとして与えられた画像ファイルの exif から Base64 エンコードされた Flag を取得できました。
Secret of the Polyglot(Forensic)
The Network Operations Center (NOC) of your local institution picked up a suspicious file, they’re getting conflicting information on what type of file it is. They’ve brought you in as an external expert to examine the file. Can you extract all the information from this strange file? Download the suspicious file here.
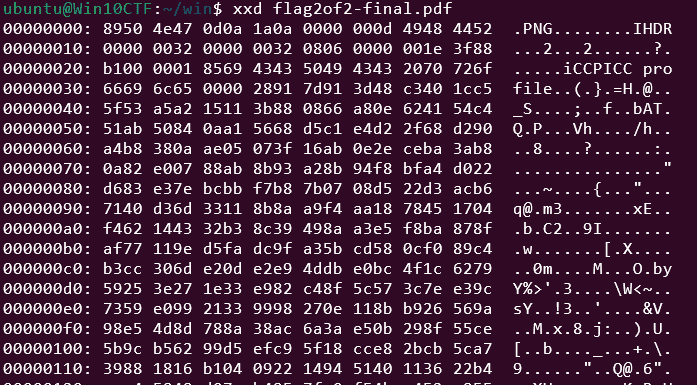
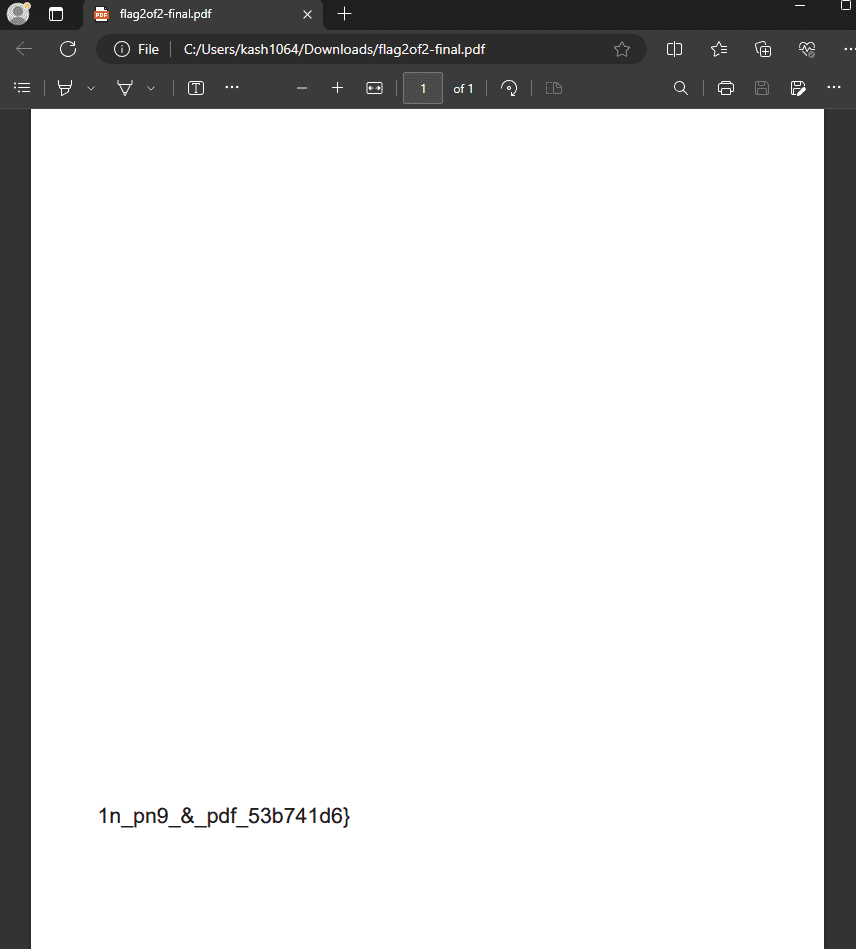
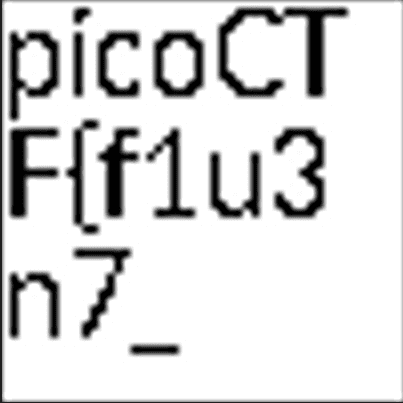
これは中々面白い問題で、PDF としても PNG としても開くことができるファイルでした。
まず、PDF から Flag の後半部分を取得します。
次に、拡張子を png に変換することで Flag の前半部分を取得しました。
picoCTF{f1u3n7_1n_pn9_&_pdf_53b741d6}
Mob psycho(Forensic)
Can you handle APKs? Download the android apk here.
問題バイナリとして与えられた apk ファイルを apktool で展開してしばらく探索したものの、Flag らしいものはみつけられませんでした。
./smali2java_linux_amd64 -path_to_smali=/home/ubuntu/Hacking/CTF/2024/picoCTF/Forensic/Mob_psycho/mobpsycho/smali_classes3/com/example/mobpsychoしかし、apt ファイルの拡張子を zip に変換して unzip したところ、color/flag.txt に Hexdump された Flag が置かれていることがわかりました。
これで正しい Flag を取得できました。
endianness-v2(Forensic)
Here’s a file that was recovered from a 32-bits system that organized the bytes a weird way. We’re not even sure what type of file it is. Download it here and see what you can get out of it
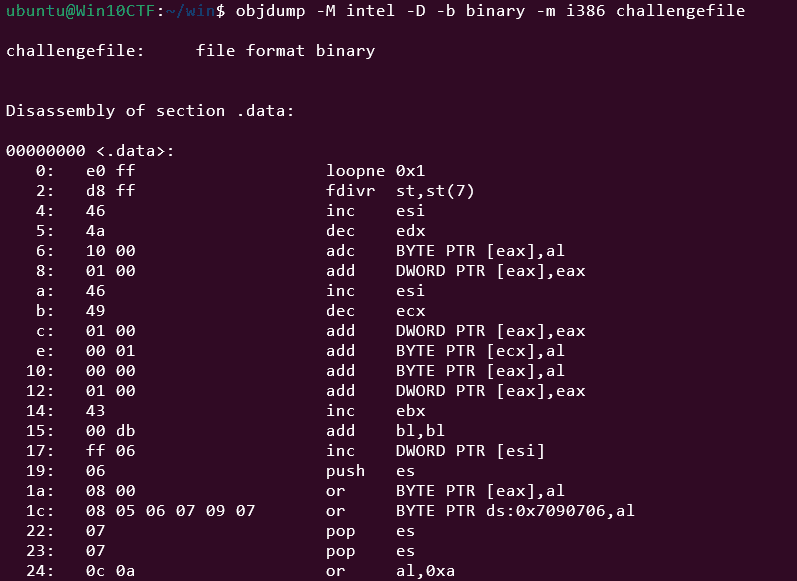
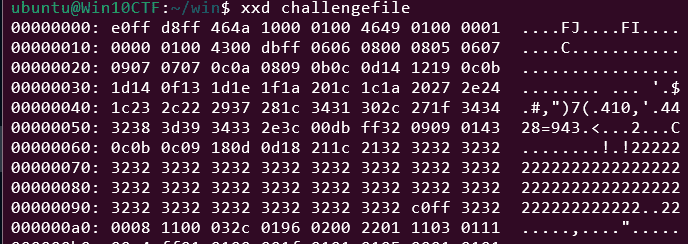
問題バイナリとして与えられたファイルは謎のバイト列でした。
objdump -M intel -D -b binary -m i386 challengefileとりあえずシェルコード化と思ったので objdump でアセンブルしてみたのですが、あまり意味のある実行コードではなさそうでした。
そこで、バイト列の先頭部分を改めて調べてみると、d8 ff e0 ff という JPG のマジックナンバーの一部が little endian のフォーマットになっていないデータであることがわかりました。
そこで、以下の Solver でバイトデータを 4 バイトごとに区切り、逆順にするという操作を繰り返し実施しました。
with open("challengefile","rb") as f:
    data = f.read()

fix = b""

for i in range(0,len(data),4):
    line = data[i:i+4]
    fix += line[::-1]

with open("fixed.jpg","wb") as f:
    f.write(fix)
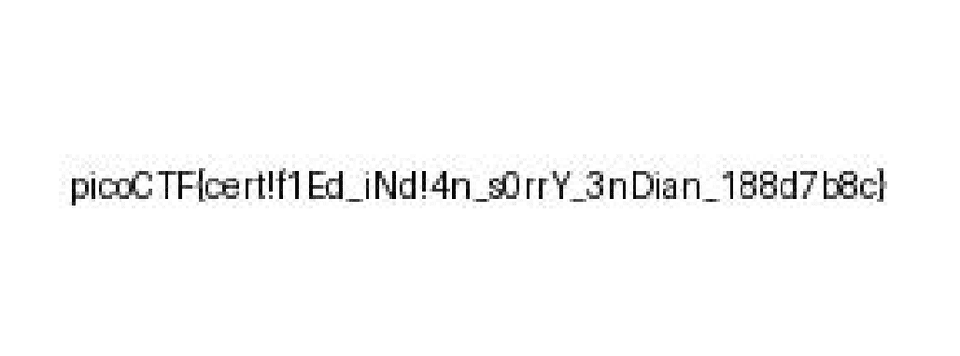
これで元の jpg ファイルを復元できたので picoCTF{cert!f1Ed_iNd!4n_s0rrY_3nDian_188d7b8c} という Flag を入手できました。
Blast from the past(Forensic)
The judge for these pictures is a real fan of antiques. Can you age this photo to the specifications? Set the timestamps on this picture to 1970:01:01 00:00:00.001+00:00 with as much precision as possible for each timestamp. In this example, +00:00 is a timezone adjustment. Any timezone is acceptable as long as the time is equivalent. As an example, this timestamp is acceptable as well: 1969:12:31 19:00:00.001-05:00. For timestamps without a timezone adjustment, put them in GMT time (+00:00). The checker program provides the timestamp needed for each. Use this picture. Additional details will be available after launching your challenge instance.
Submit your modified picture here: nc -w 2 mimas.picoctf.net 57013 < original_modified.jpg
Check your modified picture here: nc -d mimas.picoctf.net 61685
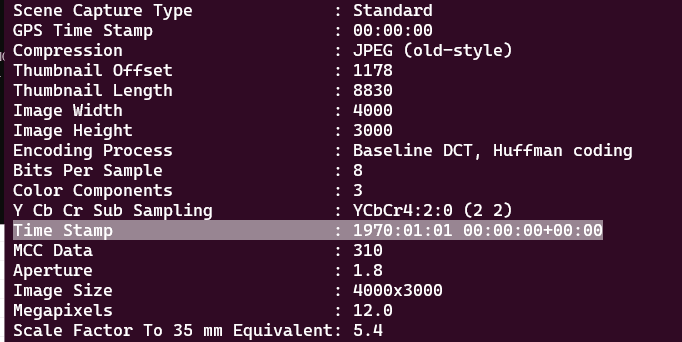
問題バイナリとして与えられたファイルの exif や MakerNotes の情報に埋め込まれた時刻を変更する問題でした。
exif 情報の時刻については任意のツールで変更が容易にできたものの、最後の MakerNotes の情報を変更するのに手間取りました。
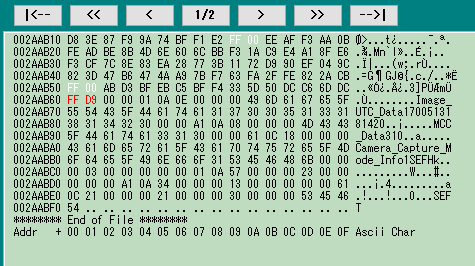
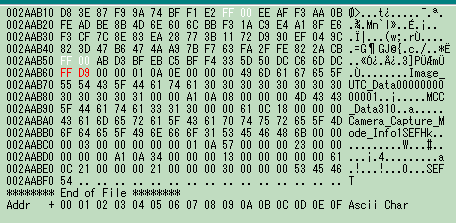
最終的には対応するツールが見つからなかったので、HexEditor を使用して MakerNotes の時刻を示す UNIX 時間が埋め込まれている箇所を特定しました。
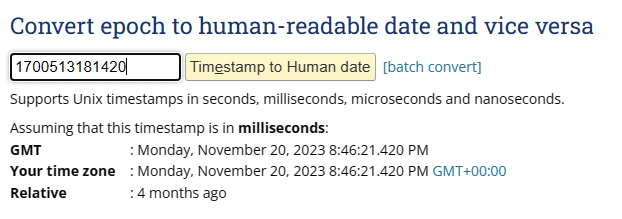
初期値の値は以下の通り 2023 年の日付を示しています。
そこで、この UNIX 時間を手動で変更しました。
これで、MakerNotes の Time Stamp の時刻を変更できました。
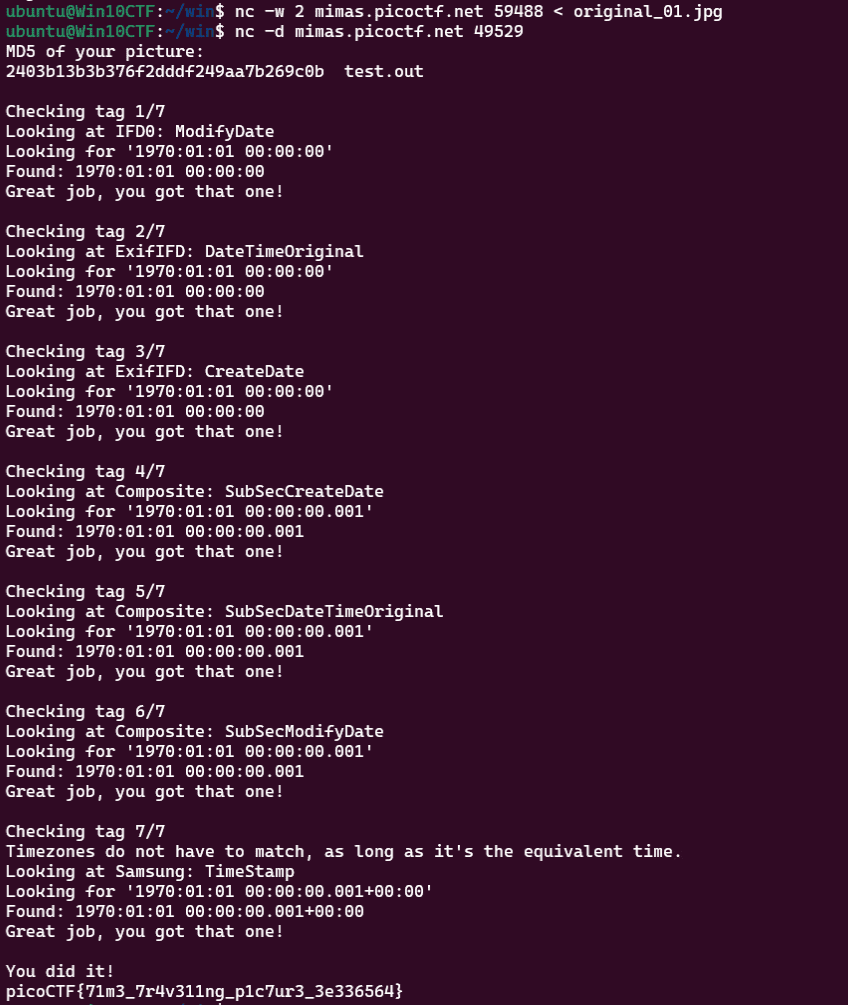
このファイルをサーバに送出することで Flag を取得できました。
Dear Diary(Forensic)
If you can find the flag on this disk image, we can close the case for good! Download the disk image here.
問題バイナリとして与えられたイメージファイルを fdisk -l disk.flag.img で調べてみたところ、Linux のイメージファイルであることがわかります。
また、parted disk.flag.img print コマンドを使用すると、ファイルシステムは ext4 であることがわかります。
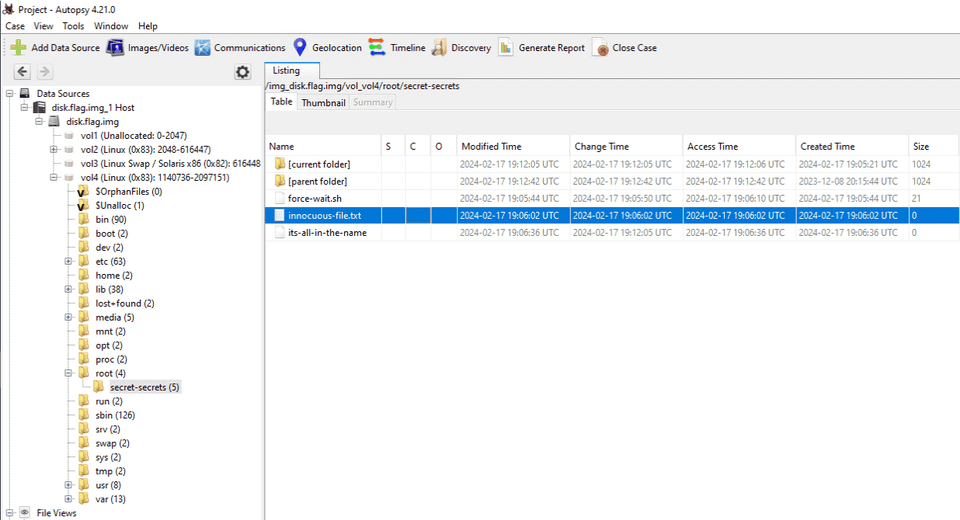
このイメージファイルを Autopsy にロードして一通り解析したところ、innocuous-file.txt という不審な空ファイルが root ディレクトリ内に存在していることがわかりました。
このファイルが非常に怪しそうですが、中々ファイルの元データをサルベージすることができませんでした。
チームメンバーの見つけた情報を見ると、イメージファイルから削除されたファイルを発掘するために fls コマンドが使えるらしいことがわかります。
参考:Linux Forensics | HackTricks | HackTricks
そこで、まずは元のイメージファイルを以下のコマンドで各パーティションに分割しました。
dd if=disk.flag.img of=part1.img bs=512 skip=2048 count=614400
dd if=disk.flag.img of=part2.img bs=512 skip=616448 count=524288
dd if=disk.flag.img of=part3.img bs=512 skip=1140736 count=956416
Linux のファイルシステムは part3.img に格納されるので、これを対象にコマンドを発行していきます。
最初のコマンドではイメージファイル内のデータを参照できます。
$ fsstat -i raw -f ext4 part3.img
{{ 省略 }}
Journal ID: 00
Journal Inode: 8

METADATA INFORMATION
--------------------------------------------
Inode Range: 1 - 119417
Root Directory: 2
Free Inodes: 116979
Inode Size: 256

CONTENT INFORMATION
--------------------------------------------
Block Groups Per Flex Group: 16
Block Range: 0 - 478207
Block Size: 1024
Reserved Blocks Before Block Groups: 1
Free Blocks: 378721

BLOCK GROUP INFORMATION
--------------------------------------------
Number of Block Groups: 59
Inodes per group: 2024
Blocks per group: 8192

Group: 0:
  Block Group Flags: [INODE_ZEROED]
  Inode Range: 1 - 2024
  Block Range: 1 - 8192
  Layout:
    Super Block: 1 - 1
    Group Descriptor Table: 2 - 5
    Group Descriptor Growth Blocks: 6 - 261
    Data bitmap: 262 - 262
    Inode bitmap: 278 - 278
    Inode Table: 294 - 799
    Data Blocks: 8390 - 8192
  Free Inodes: 179 (8%)
  Free Blocks: 0 (0%)
  Total Directories: 300
  Stored Checksum: 0xB4C7

Group: 1:
  Block Group Flags: [INODE_UNINIT, INODE_ZEROED]
  Inode Range: 2025 - 4048
  Block Range: 8193 - 16384
  Layout:
    Super Block: 8193 - 8193
    Group Descriptor Table: 8194 - 8197
    Group Descriptor Growth Blocks: 8198 - 8453
    Data bitmap: 263 - 263
    Inode bitmap: 279 - 279
    Inode Table: 800 - 1305
    Data Blocks: 8454 - 16384
  Free Inodes: 2024 (100%)
  Free Blocks: 270 (3%)
  Total Directories: 0
  Stored Checksum: 0x6A4E
次のコマンドでは fls でイメージファイル内のディレクトリを列挙できます。
このように inode を指定していない場合にはルートディレクトリの inode が使用されます。
$ fls -i raw -f ext4 part3.img
d/d 32513:      home
d/d 11: lost+found
d/d 32385:      boot
d/d 64769:      etc
d/d 32386:      proc
d/d 13: dev
d/d 32387:      tmp
d/d 14: lib
d/d 32388:      var
d/d 21: usr
d/d 32393:      bin
d/d 32395:      sbin
d/d 32539:      media
d/d 203:        mnt
d/d 32543:      opt
d/d 204:        root
d/d 32544:      run
d/d 205:        srv
d/d 32545:      sys
d/d 32530:      swap
V/V 119417:     $OrphanFiles
今回はすでに root ディレクトリ内に存在しない情報を取得するために、別の特別な inode を指定します。
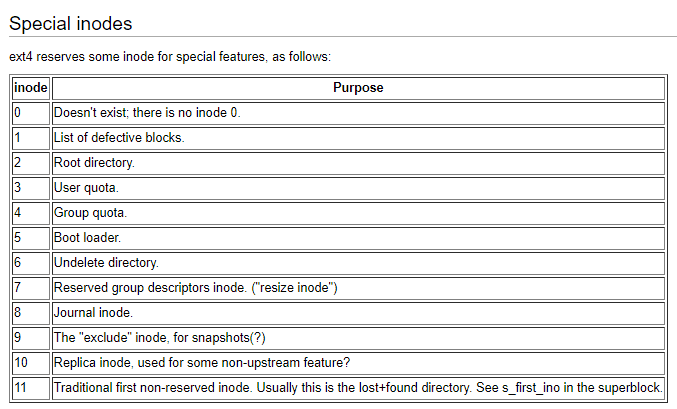
以下の予約された inode のうち、Journal inode をターゲットにします。
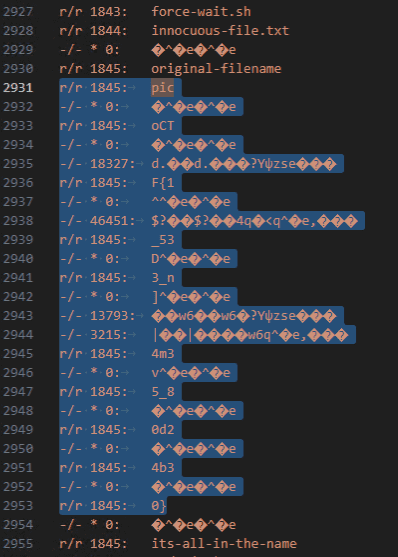
fls -i raw -f ext4 part3.img 8 で出力されたジャーナル領域のファイル名から、正しい Flag が picoCTF{1_533_n4m35_80d24b30} であることを特定できました。
まとめ
Rev と Forensic のボス問はそこまで難しくなかったですが、Pwn や Web はレベルが高そうでした。
そのレベルの問題がでても解けるようにしておきたいですね。


