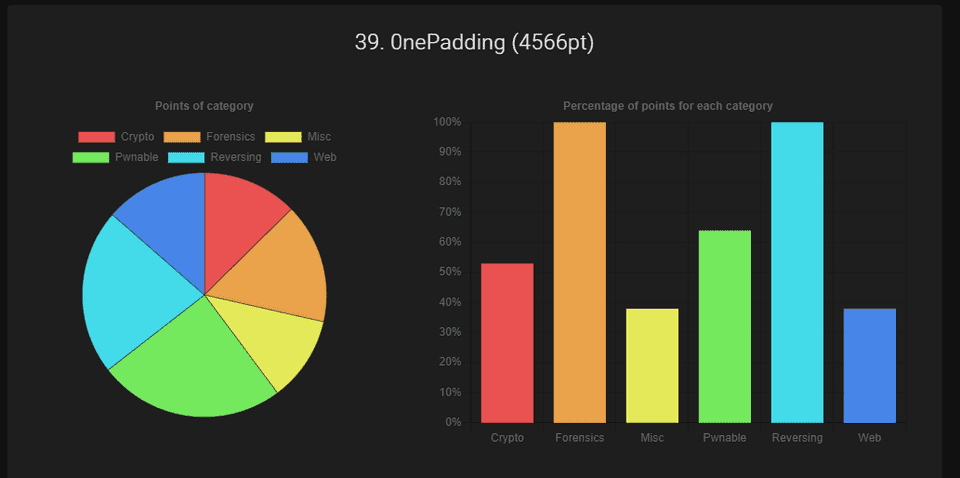
2023 年 5 月 4 日から開催されていた WaniCTF 2023 に 0nePadding で参加していました。
Rev と Forensic は全完し、最終順位は 39 位 / 1110 チームでした。
例によって Reversing に取り組み全完できたので、いくつか Writeup としてまとめておきます。
もくじ
javersing(Rev)
問題バイナリの javersing.jar を jd-gui でデコンパイルすると以下の出力を得られます。
import java.util.Scanner;

public class javersing {
  public static void main(String[] paramArrayOfString) {
    String str1 = "Fcn_yDlvaGpj_Logi}eias{iaeAm_s";
    boolean bool = true;
    Scanner scanner = new Scanner(System.in);
    System.out.println("Input password: ");
    String str2 = scanner.nextLine();
    str2 = String.format("%30s", new Object[] { str2 }).replace(" ", "0");
    for (byte b = 0; b < 30; b++) {
      if (str2.charAt(b * 7 % 30) != str1.charAt(b))
        bool = false;
    }
    if (bool) {
      System.out.println("Correct!");
    } else {
      System.out.println("Incorrect...");
    }
  }
}このコードを読むと、入力した値のb * 7 % 30番目の値が str1の b 番目の値と一致するかの検証を行っています。
そこで、str1 のb * 7 % 30番目の値を取り出す以下の Solver を作成し、Flag を取得しました。
base = "Fcn_yDlvaGpj_Logi}eias{iaeAm_s"
flag = [""] * 30

for i in range(30):
    flag[i*7%30] = base[i]

print("".join(flag))
Lua(Rev)
Lua で作成された問題コードが与えられます。
※ 1300 行くらいあるので Gist に分割しました。
コードをざっと眺めると、関数や変数の値は暗号化されてスクリプト内に埋め込まれているようでした。
馬鹿正直にコードを読むのはきつそうだったので、暗号化を解除していそうなところにブレークポイントを設定してみることにしました。
デバッグは VSCode の拡張機能を使用しました。
{
    // Use IntelliSense to learn about possible attributes.
    // Hover to view descriptions of existing attributes.
    // For more information, visit: https://go.microsoft.com/fwlink/?linkid=830387
    "version": "0.2.0",
    "configurations": [
        {
            "type": "lua",
            "request": "launch",
            "name": "Debug",
            "program": "${workspaceFolder}/CTF/2023/WaniCTF2023/Rev/Lua/main.lua",
            "consoleCoding": "utf8",
            "sourceCoding": "utf8",
            "luaexe": "/usr/bin/lua5.1",
            "outputCapture": [
                "print",
                "stderr",
            ],
        }
    ]
}
今回の問題コードは 5.2 以降の Lua では実行できないようでしたので、luaexeにはインストールしたlua5.1のパスを指定しています。
これで、問題コードの以下の箇所にブレークポイントを設定してみたところ、暗号化解除された Flag 文字を含む Base64 テキストが取得できました。
local CRYPTEDlIIllIII = "NGI2d3Q8YSp3KmsvYWc9K0c6dw=="
local CRYPTEDlIIlIIlI = function(a, b)
  local c = CRYPTEDlIIlIlIl(CRYPTEDlIIlIllI(a))
  local d = c["\99\105\112\104\101\114"](c, CRYPTEDlIIlIllI(b))
  return CRYPTEDlIIlIllI(d)
end
theseus(Rev)
Ghidra でデコンパイルしたところ、compareという領域に Flag 文字列を埋め込んだ後に、compare関数で入力値と検証を行っていることがわかりました。
そのため、compare関数にブレークポイントを設定することで Flag を取得できました。
web_assembly(Rev)
Web Asssembly の問題でした。
とりあえずダウンロードした wasm バイナリを wasm-decompile でデコンパイルするところから始めました。
./wasm-decompile index.wasm -o decompile.txt出力結果を見ると分割された Flag のような文字列がちりばめられたデータ領域があることがわかりました。
data d_3rinfinityFebruaryJanuaryJul(offset: 65536) =
  "3r!}\00infinity\00February\00January\00July\00Thursday\00Tuesday\00Wed"
  "nesday\00Saturday\00Sunday\00Monday\00Friday\00May\00%m/%d/%y\004n_3x\00"
  "-+   0X0x\00-0X+0X 0X-0x+0x 0x\00Nov\00Thu\00unsupported locale for st"
  "andard input\00August\00Oct\00Sat\000us\00Apr\00vector\00October\00Nov"
  "ember\00September\00December\00ios_base::clear\00Mar\00p_0n_Br\00Sep\00"
  "3cut3_Cp\00%I:%M:%S %p\00Sun\00Jun\00Mon\00nan\00Jan\00Jul\00ll\00Apri"
  "l\00Fri\00March\00Aug\00basic_string\00inf\00%.0Lf\00%Lf\00true\00Tue\00"
  "false\00June\00Wed\00Dec\00Feb\00Fla\00ckwajea\00%a %b %d %H:%M:%S %Y\00"
  "POSIX\00%H:%M:%S\00NAN\00PM\00AM\00LC_ALL\00LANG\00INF\00g{Y0u_C\00012"
  "3456789\00C.UTF-8\00.\00(null)\00Incorrect!\00Pure virtual function ca"
  "lled!\00Correct!! Flag is here!!\00feag5gwea1411_efae!!\00libc++abi: \00"
  "Your UserName : \00Your PassWord : \00\00\00\00\00\00L\04\01\00\02\00\00"
ここからでもある程度 guessing できましたが、最終的には Chrome のデバッグ機能を使って正しいパスワードを入力した場合の処理を追うことにしました。
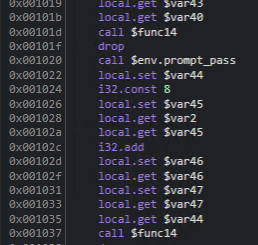
まず、func13 の $env.prompt_pass 以降が、パスワード入力後の処理であることがわかります。
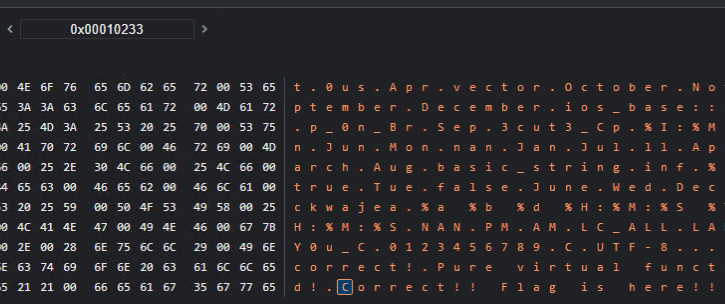
続いて、Chrome の Memory Inspector を起動します。
そこから、例えば以下のように、任意の文字列の格納されるアドレスを特定できます。
この中から Flag として使用されていそうな文字列のアドレスを逆引きしたところ、func13 でこれらの文字列が以下の順序で参照されていることがわかりました。
i32.const 65948
i32.const 66022
i32.const 65642
i32.const 65821
i32.const 65809
i32.const 65738
i32.const 65536
Memory Inspector に各アドレスを順番に入力した結果 Flag を取得できました。
lowkey_messedup(Forensic)
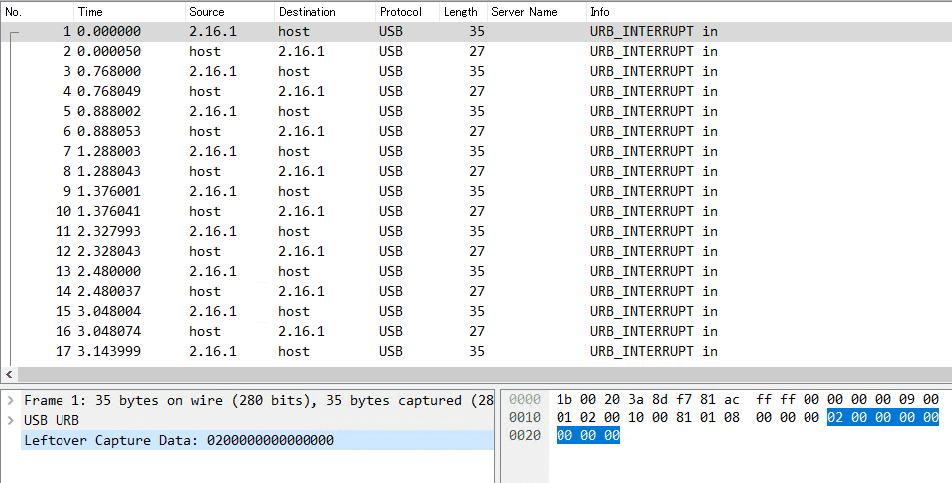
問題バイナリとして与えられた pcap ファイルを展開すると、以下のように Leftcver Capture Dataを含む一連の USB パケットであることがわかります。
このような通信は、以下の HackTricks にあるような USB Keystrokes に該当することがわかります。
参考:USB Keystrokes - HackTricks
キーストロークを抽出するため、以下のコマンドを実行しました。
# usb.capdata の抽出
tshark -r ./chall.pcap -Y 'usb.capdata && usb.data_len == 8' -T fields -e usb.capdata | sed 's/../:&/g2' > keystrokes.txt

# keystrokes.txt からキー入力を解析
python3 solver.py ./keystrokes.txt上記を実行するとFLAG{Big_br0ther_is_watching_y0ur_keyboard⌫⌫⌫⌫0ard}を取得できました。
間に BackSpace が存在していたので、実際の Flag 入力がFLAG{Big_br0ther_is_watching_y0ur_keyb0ard}であることがわかりました。
solver.py は以下を使用しました。
#!/usr/bin/python
# -*- coding: utf-8 -*-

import sys

#More symbols in https://www.fileformat.info/search/google.htm?q=capslock+symbol&domains=www.fileformat.info&sitesearch=www.fileformat.info&client=pub-6975096118196151&forid=1&channel=1657057343&ie=UTF-8&oe=UTF-8&cof=GALT%3A%23008000%3BGL%3A1%3BDIV%3A%23336699%3BVLC%3A663399%3BAH%3Acenter%3BBGC%3AFFFFFF%3BLBGC%3A336699%3BALC%3A0000FF%3BLC%3A0000FF%3BT%3A000000%3BGFNT%3A0000FF%3BGIMP%3A0000FF%3BFORID%3A11&hl=en
KEY_CODES = {
    0x04:['a', 'A'],
    0x05:['b', 'B'],
    0x06:['c', 'C'],
    0x07:['d', 'D'],
    0x08:['e', 'E'],
    0x09:['f', 'F'],
    0x0A:['g', 'G'],
    0x0B:['h', 'H'],
    0x0C:['i', 'I'],
    0x0D:['j', 'J'],
    0x0E:['k', 'K'],
    0x0F:['l', 'L'],
    0x10:['m', 'M'],
    0x11:['n', 'N'],
    0x12:['o', 'O'],
    0x13:['p', 'P'],
    0x14:['q', 'Q'],
    0x15:['r', 'R'],
    0x16:['s', 'S'],
    0x17:['t', 'T'],
    0x18:['u', 'U'],
    0x19:['v', 'V'],
    0x1A:['w', 'W'],
    0x1B:['x', 'X'],
    0x1C:['y', 'Y'],
    0x1D:['z', 'Z'],
    0x1E:['1', '!'],
    0x1F:['2', '@'],
    0x20:['3', '#'],
    0x21:['4', '$'],
    0x22:['5', '%'],
    0x23:['6', '^'],
    0x24:['7', '&'],
    0x25:['8', '*'],
    0x26:['9', '('],
    0x27:['0', ')'],
    0x28:['\n','\n'],
    0x29:['␛','␛'],
    0x2a:['⌫', '⌫'],
    0x2b:['\t','\t'],
    0x2C:[' ', ' '],
    0x2D:['-', '_'],
    0x2E:['=', '+'],
    0x2F:['[', '{'],
    0x30:[']', '}'],
    0x32:['#','~'],
    0x33:[';', ':'],
    0x34:['\'', '"'],
    0x36:[',', '<'],
    0x37:['.', '>'],
    0x38:['/', '?'],
    0x39:['⇪','⇪'],
    0x4f:[u'→',u'→'],
    0x50:[u'←',u'←'],
    0x51:[u'↓',u'↓'],
    0x52:[u'↑',u'↑']
}


#tshark -r ./usb.pcap -Y 'usb.capdata && usb.data_len == 8' -T fields -e usb.capdata | sed 's/../:&/g2' > keyboards.txt
def read_use(file):
    with open(file, 'r') as f:
        datas = f.readlines()

    datas = [d.strip() for d in datas if d]
    cursor_x = 0
    cursor_y = 0
    lines = []
    output = ''
    skip_next = False
    lines.append("")

    for data in datas:
        shift = int(data.split(':')[0], 16) # 0x2 is left shift 0x20 is right shift
        key = int(data.split(':')[2], 16)

        if skip_next:
            skip_next = False
            continue

        if key == 0 or int(data.split(':')[3], 16) > 0:
            continue

        #If you don't like output get a more verbose output here (maybe you need to map new rekeys or remap some of them)
        if not key in KEY_CODES:
            #print("Not found: "+str(key))
            continue

        if shift != 0:
            shift=1
            skip_next = True

        if KEY_CODES[key][shift] == u'↑':
            lines[cursor_y] += output
            output = ''
            cursor_y -= 1

        elif KEY_CODES[key][shift] == u'↓':
            lines[cursor_y] += output
            output = ''
            cursor_y += 1

        elif KEY_CODES[key][shift] == u'→':
            cursor_x += 1

        elif KEY_CODES[key][shift] == u'←':
            cursor_x -= 1

        elif KEY_CODES[key][shift] == '\n':
            lines.append("")
            lines[cursor_y] += output
            cursor_x = 0
            cursor_y += 1
            output = ''

        elif KEY_CODES[key][shift] == '[BACKSPACE]':
            output = output[:cursor_x-1] + output[cursor_x:]
            cursor_x -= 1

        else:
            output = output[:cursor_x] + KEY_CODES[key][shift] + output[cursor_x:]
            cursor_x += 1

    if lines == [""]:
        lines[0] = output

    if output != '' and output not in lines:
        lines[cursor_y] += output

    return '\n'.join(lines)

if __name__ == '__main__':
    if len(sys.argv) < 2:
        print('Missing file to read...')
        exit(-1)
    sys.stdout.write(read_use(sys.argv[1]))
web-64bps(Web)
かなり久しぶりに Web の問題を解きました。
問題サーバは、以下の Dockerfile と nginx.conf で構成されているサーバです。
FROM nginx:1.23.3-alpine-slim

COPY nginx.conf /etc/nginx/nginx.conf
COPY flag.txt /usr/share/nginx/html/flag.txt

RUN cd /usr/share/nginx/html && \
    dd if=/dev/random of=2gb.txt bs=1M count=2048 && \
    cat flag.txt >> 2gb.txt && \
    rm flag.txt
user nginx;
worker_processes auto;
error_log /var/log/nginx/error.log notice;
pid /var/run/nginx.pid;
events {
worker_connections 1024;
}
http {
include /etc/nginx/mime.types;
default_type application/octet-stream;
keepalive_timeout 65;
gzip off;
limit_rate 8; # 8 bytes/s = 64 bps
server {
listen 80;
listen [::]:80;
server_name localhost;
location / {
root /usr/share/nginx/html;
index index.html index.htm;
}
}
}Flag テキストは 2 GB のランダムなバイナリの末尾に結合されており、Nginx 側の limit_rate が極めて小さく設定されているために、実質的にダウンロードが不可能な状況でした。
そのため、HTTP リクエストでContent-RangeとContent-Lengthを指定することで、任意のオフセットのバイトデータのみを抽出することにしました。
参考:python - read file from server with some offset - Stack Overflow
このようなリクエストは curl の -r オプションを使用することでも発行できます。
今回は、以下のように 2147483603 から 2147483793 までのおよそ 200 バイト分くらいを取得するコマンドで Flag を取得できました。
curl -r 2147483603-2147483793 "https://64bps-web.wanictf.org/2gb.txt" -o flag.txtまとめ
序盤は 10 位以内に入れるいいペースだったのですが、途中から解ける問題がなくなり頭打ちになりました。
Misc の競プロ問は実装力不足で解けなかったので悔しいです。
競プロ再開した方がいいんだろうか。。


